Everyone talks about link quality over quantity now, and they are absolutely right.
But profile creation is not dead. It has simply evolved.
When done properly, profile creation still supports SEO, strengthens branding,
and helps search engines understand your business better through trusted
profile creation sites.
Why Profile Creation Sites Still Matter
1. More Opportunities for Discovery
Every trusted platform where your business appears creates another opportunity
for people to discover your brand.
It may not create instant traffic overnight, but consistent visibility across
multiple profile creation sites adds long-term value.
2. Stronger Entity Signals for Search Engines
Search engines pay attention to consistency.
When your business name, logo, description, and website appear the same across
different platforms, Google starts connecting those signals together.
This helps establish trust and confirms that your business is legitimate.
3. A More Natural Backlink Profile
A healthy backlink profile should look natural.
If every backlink comes only from guest posts or press releases, the pattern can
look artificial. Profile links help diversify your backlink sources and create a
more balanced link profile.
4. Trust Through Established Platforms
Platforms like GitHub and Crunchbase already have strong authority and credibility.
While a single profile link will not suddenly rank your website on page one,
having a professional presence on trusted profile creation sites strengthens your online reputation.
Take a Look
You might find this helpful. Feel free to explore it below.
Look, I get it, you’ve probably clicked on a dozen articles promising easy money, but here’s the thing I actually learned by trying this stuff myself. Online tutoring worked for me when nothing else did, not because I’m some genius, just because I was willing to show up and help kids with their homework, and yeah, students are always looking for help, always, so if you passed a few classes and can explain things without putting people to sleep? You can get paid for that, simple.Here are some websites you can explore.
Studypool: Answer Questions and Get Paid
I like Studypool because it’s simple, students post questions, you bid on them, and if they pick you, you provide the answer.
You get paid after approval, there’s no fixed schedule, so you can work late at night or early in the morning, I think we should all appreciate that kind of flexibility.
My advice? Focus on clear, step by step explanations, short answers won’t win you repeat customers.
Chegg: Become a Homework Expert
Chegg is huge, I mean, millions of students use it every day, you apply as an expert, pass a subject test, and start answering questions.
We should be honest here, Chegg expects high quality work, but if you’re serious, it can bring in steady monthly income, math and science experts are especially in demand.
I recommend starting with one subject you really know well, don’t try to cover everything at once.
Course Hero: Earn Twice, Once from Notes and Once from Tutoring
Here’s something I love about Course Hero, you can earn money in two ways.
First, you upload old notes, past papers, or study guides, that creates passive income, second, you answer live questions from students.
We should take advantage of both if we already have good study materials lying around, why let them sit in a folder when they could earn you cash?
My tip, upload organized, clean notes, the better your notes look, the more people will view them.
Preply: Teach Live and Set Your Own Rate
Preply feels different because you’re in control, you create a profile, set your hourly rate, and students book one on one lessons with you.
I think this is perfect if you enjoy talking and teaching live, you can teach English, math, science, or even music.
Take a Look
You might find this helpful. Feel free to explore it below.
We should remember that students choose us based on our personality and teaching style, so don’t just list your qualifications, show some warmth in your profile.
Tutor.com
So this one is different, Tutor.com is like the corporate job of tutoring websites, you apply, you take tests, and if you pass, you’re in, but they expect you to show up on time and actually teach, no ghosting.
Honestly? I almost didn’t get in, failed my first subject test, felt like an idiot, but I tried again and barely passed.
The good part? You don’t have to fight for students like on other sites, they just send them to you, steady work, boring but reliable, if you need rent money, this is the one.
The bad part? You can’t just log in whenever you feel like it, there are shifts, so yeah, less freedom than Studypool, but some months, that stability saved me.
Simple Tips I Think We Should Follow
Let me share what actually works based on my experience.
First, improve how you explain things, you should practice breaking down hard topics into simple words.
Second, be consistent, I’ve seen people give up too fast, log in regularly, and the earnings will follow.
Third, focus on quality not speed, one great answer can bring you more students than ten rushed ones.
Fourth, stick to your strong subjects, I only teach what I’m confident in, and you should do the same.
Finally, build a profile that feels human, share a little about yourself, students trust real people, not robots.
My Final Thoughts
Look, I’m not going to sit here and tell you this is some life changing miracle, it’s not, you’re not gonna get rich, but if you need a couple hundred bucks a month to cover a bill or buy groceries without leaving your house? Yeah, this works.
I’ve tried all those platforms, Studypool, Chegg, all of them, some are okay, some are annoying, you’ll figure out which one fits you.
Here’s the truth nobody tells you, the first week or two will feel dead, you’ll post bids, nothing, you’ll wonder if you’re wasting time, I almost quit twice, glad I didn’t.
You don’t need to be perfect, I’ve given wrong answers before, felt horrible, apologized and fixed it, students actually respected that more than when I got everything right.
So just pick one, any one, don’t overthink it, try it for a month, if it sucks, try another, that’s what I did.
And yeah, the money adds up slower than you want, but it adds up, one night I checked my account and had $300 sitting there, didn’t even realize I’d earned that much, felt good.
So yeah, give it a shot, what do you have to lose besides an hour or two at night when you’re just watching Netflix anyway?
Affiliate Disclosure:
This page includes an affiliate link. We may earn a small commission at no extra cost to you.
You don’t need a website or advanced technical skills to start earning online. With Adsterra SmartLinks and social media traffic, you can build a simple and sustainable income stream. Let’s walk through two powerful and safe methods step by step.
Step 1: Create Your Adsterra Publisher Account
Go to the Adsterra website and register as a publisher. Verify your email address and set up your payment method immediately to avoid withdrawal issues later.
From your dashboard, navigate to the Direct Links section, create a new link, and choose a category that fits your audience. Copy the generated URL and this is your SmartLink.
Never drop a raw link in your bio. Instead, write a short and compelling one-liner that sparks curiosity.
“The free tool I use every day 👇 Try it now”
“Discover what everyone is watching”
“Get instant access to the resource I talk about”
Add your Adsterra SmartLink in your bio’s website section (Instagram, TikTok, Twitter, etc.). On Facebook, you can pin a post with a similar CTA.
Step 3: Drive Traffic to Your Bio
Create valuable content and guide users to your bio link naturally.
Instagram Reels: “Comment TOOL and check my bio link.”
TikTok: “Link in bio for the free resource.”
This approach looks natural to platforms and keeps your account safe.
Method 2: The Mini Landing Page Strategy
A mini landing page is a simple one-page site that adds value before sending users to your SmartLink. This builds trust and reduces spam risk.
Step 1: Choose a Free Tool
Carrd
Google Sites
Notion
Linktree / Beacons
Step 2: Pick a Keyword
Use tools like Google Autocomplete or AnswerThePublic to find trending keywords.
Examples:
free video editing tool no watermark
best side hustle apps that pay
watch motivational speech now
Step 3: Write Engaging Content
Keep it short and curiosity-driven:
“Looking for a free tool that edits videos in one click? Thousands of creators use this hidden gem to save hours every week. Tap below to try it now.”
Step 4: Add a Clear CTA Button
Create a button like:
Try This Tool
Watch Now
Get Instant Access
Link this button to your Adsterra SmartLink.
Step 5: Share Your Landing Page
Post your landing page URL across all platforms. Since it looks like a normal website, it’s safe and trusted.
High-Converting CTA Examples
Try this tool, it’s free
Watch now before it’s taken down
See what’s trending
Grab the secret resource
Click here to unlock
Complete Example Workflow
Create your Adsterra account and SmartLink
Build a Carrd landing page
Add a short engaging description
Insert CTA button with SmartLink
Share link in bio
Track & Increase Earnings
Use your Adsterra dashboard to monitor clicks and revenue. Traffic from countries like the US, UK, Canada, and Australia typically pays more, but global traffic also adds up.
Tip: Always test your landing page on mobile devices.
Common Mistakes to Avoid
Posting direct ad links in comments or captions
Using misleading titles
Ignoring payment setup
Breaking platform rules
Disclaimer: This article may contain affiliate links. This means I may earn a small commission if you click on a link and sign up or make a purchase, at no extra cost to you. I only recommend tools and platforms that I personally trust and believe can provide value. Your support helps keep this content free and useful.
Final Thoughts
You don’t need a website or blog to earn from Adsterra. By using a smart and safe approach bio links or mini landing pages you can build a long-term income stream.
🚀 Take action today: Create your account, generate your SmartLink, and apply one of these methods. Consistency and value are the keys to success.
If you are interested in creating AI generated videos and selling them online but do not really know where to start, then this guide will help you understand everything step by step in a simple, practical way. The demand for short form video content is growing very fast, and AI tools have made it easier than ever to create professional looking videos without advanced skills, or expensive equipment.This blog will explain everything from choosing your niche, creating videos, and selling them as digital products.
1. Understanding the Opportunity
AI video creation has become one of the fastest growing online earning methods right now. Content creators, businesses, influencers, all of them need fresh video content for platforms like:
YouTube Shorts
Instagram Reels
TikTok
Facebook Pages
Many of them do not have enough time, or skills to create videos themselves, so they buy ready made video packs instead.
This is where the opportunity starts for you.
Take a Look
You might find this helpful. Feel free to explore it below.
Most beginners prefer Gumroad because it is simple.
7. How to Sell on Gumroad
Selling on Gumroad is very easy actually:
Steps:
Create account on Gumroad
Upload your video pack
Add title and description
Set price
Publish product
Example title
10 Viral AI Generated Short Videos for Social Media Growth
8. Marketing Your Product
Just creating product is not enough, you also need to promote it.
Where to promote
Facebook groups
Instagram pages
Reddit communities
TikTok videos
YouTube Shorts
Go where creators are already active, because they are your real buyers.
9. One Time Purchase Advantage
Gumroad allows one time purchase option, which is actually very useful.
Why it works
Buyer feels product is exclusive
Feels like limited access content
Increases chances of fast buying
Builds value perception
Even if content is digital, presentation matters a lot.
10. Scaling Your Business
Once you start getting some sales, you can grow further.
Growth ideas
Create more video packs
Increase price slowly
Offer custom video services
Target different niches
Build your own brand
Advanced idea
Monthly subscription packs
Personal website store
Premium client services
Conclusion
AI video creation is not just a trend, it is a real online earning opportunity if you do it properly. You do not need advanced skills, just consistency, creativity, and understanding of what people want.
Remember:
Follow trends
Create useful video packs
Start with low price
Focus on audience targeting
Keep promoting your work
With time, this can become a strong digital income source, if you stay consistent and improve step by step.
📚 Explore More Blogs
If you found this guide helpful, explore more articles on our blog.
Affiliate Disclosure:
This page includes an affiliate link. We may earn a small commission at no extra cost to you.
If you want to write clean, scalable, and professional Flutter code, understanding Clean Architecture is essential.In this guide, we will focus only on the core concept of Clean Architecture:
❌ No State Management
❌ No Dependency Injection
✅ Only core architecture (Domain + Data + Presentation)
🧠 What is Clean Architecture?
Clean Architecture is a design approach where an application is divided into layers to achieve:
Well-organized code
Easier maintenance and updates
Better testability
Scalability for large applications
🔑 The Golden Rule
Dependencies always point inward
Inner layers are independent and do not know about outer layers
Pinterest is often misunderstood as just a place for ideas and inspiration but in reality, it’s a powerful platform to generate traffic, build an audience, and earn money online.
If you use it the right way, Pinterest can become more than just a social platform it can turn into a long-term income asset.
In this article, I’ll walk you through the most practical ways to earn from Pinterest, and then share my personal favorite method: Rank & Rent a strategy that many people are still not using properly.
Can You Really Earn from Pinterest?
Yes, absolutely but not overnight.
Pinterest works more like a search engine than a typical social media platform. That means your pins can continue getting impressions and clicks for months even years after publishing.
If you stay consistent and strategic, the results compound over time.
Different Ways to Earn from Pinterest
Affiliate Marketing
This is one of the easiest ways to start.
You create pins around products (for example: fashion, gadgets, home decor), and link them with your affiliate links. When someone clicks and buys, you earn a commission.
The trick is:
Use eye-catching pin designs
Target the right keywords
Focus on problems people are actively searching for
Drive Traffic to Your Blog
Pinterest is excellent for sending free traffic to your website or blog.
Once users land on your site, you can monetize through:
Ads
Affiliate links
Sponsored content
More traffic = more earning potential.
Sell Your Own Products or Services
If you already have something to sell, Pinterest can help you scale it.
You can promote:
Digital products (ebooks, templates, courses)
Freelance services
Physical products
The audience on Pinterest is often in a buying mindset, which makes it easier to convert traffic into sales.
Offer Pinterest Services
Many businesses don’t understand Pinterest. That’s where you come in.
You can offer services like:
Pin creation
Account management
Keyword research
Growth strategy
You can easily sell these services on platforms like Fiverr and start earning even if your own account is still growing.
Rank & Rent Strategy (My Favorite Method)
Now let’s talk about the most powerful and underrated strategy Rank & Rent.
This is personally my favorite because it doesn’t rely on selling products or waiting for affiliate sales. Instead, you build an asset and get paid for access to it.
What is Rank & Rent?
Simple idea:
You create a niche-based Pinterest account
You grow it and get impressions
Your pins start ranking in search
Then you charge others to publish or promote their content on your account
In short: You build the audience and others pay to reach it.
Step-by-Step: How to Build a Rank & Rent Account
Choose a Clear Niche
Don’t go random.
Pick one niche like:
Fitness
Beauty
Home decor
Travel
Online earning
Tech etc
A focused niche helps your account grow faster and rank better.
Optimize Your Profile Properly
Your profile should clearly tell Pinterest:
What your account is about
Who it’s for
Use keywords in:
Username
Bio
Board names
This helps your account appear in search results.
Stay Consistent (This is Everything)
Most people fail here.
If your account is new:
Start with 2~3 pins daily
Gradually move to 5~8 pins per day
Consistency builds trust with the algorithm.
Use Smart Keyword Strategy
Pinterest runs on keywords.
Search on Pinterest:
Try different keyword combinations
Look at suggestions
Check what people are searching
You can also use tools like Google Trends to validate if your niche has demand.
Analyze and Double Down
Once you start getting impressions:
Check which pins perform best
Create more content around those topics
Improve designs and titles
This is how growth becomes faster over time.
How to Make Money with Rank & Rent
Once your account starts getting good impressions, you can monetize it in simple ways:
Charge for Pin Publishing
You can offer:
Paid pin posting
Product promotions
Brand exposure
Clients will pay you because you already have reach and visibility.
Sell Services on Freelance Platforms
Create gigs on Fiverr like:
“I will promote your product on my Pinterest account”
“I will publish pins for your brand”
Even a small account with targeted traffic can make money.
Monthly Retainers
Instead of one-time clients:
Offer monthly packages
Post regularly for clients
Build long-term income
This turns your Pinterest account into a recurring revenue source.
Why Rank & Rent is So Powerful
You don’t need your own product
You don’t depend on conversions
You earn directly from your audience
It scales easily
Once one account works, you can repeat the same process in different niches.
You can also check out this top-rated gig on Fiverr, which is doing Pinterest rank and rent strategy
Note: This is an affiliate link. If you purchase through this link, I may earn a small commission at no extra cost to you. Final Thoughts
Pinterest is not a “quick money” platform but it’s one of the most underrated long-term income sources.
If you:
Stay consistent
Focus on one niche
Use proper keywords
And apply the Rank & Rent strategy
You can turn a simple Pinterest account into a valuable digital asset that pays you regularly.
Start small, stay consistent, and give it time the results will come.
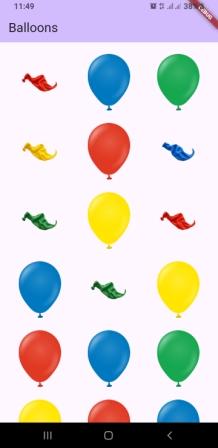
In this article, we learn an animation concept for a balloon burst animation. This may look like a simple animation, but the concept behind it is at an advanced level. By using this, you can create your own animations for celebrations, birthdays, and order-completed pages in shopping apps, etc.
The main purpose of this article is to provide the source code for this balloon burst animation so that you can use it in your own application.
Dart Files for the Balloon Burst Animation Widget
The source code includes the following files:
balloon.dart
balloon_item.dart
particle.dart
particle_controller.dart
particle_painter.dart
balloon_burst_widget.dart
How to Use the Balloon Burst Animation Widget in Your App
Copy all the files mentioned above from the source code and paste them into your own project. Then use the widget class “BalloonBurstWidget” from the balloon_burst_widget.dart file. After that, pass a list of your own images to this widget.
For testing purposes, you can also copy all the images from the source code assets folder.
Want more ready-to-use source code for your projects? Explore our Source Codes page, where you’ll find examples from various programming languages and frameworks that can help you bring your ideas to life.
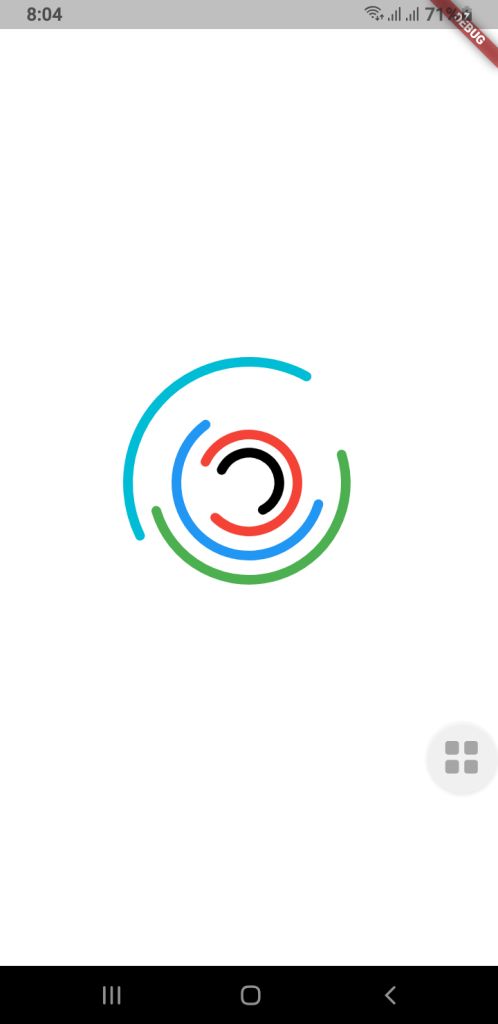
Loading indicators are an important part of making a mobile experience look and feel smooth and professional. A lot of developers use built-in progress bars or spinners, but custom animations can make your app look different, help with branding, and make it feel like it’s flowing.
This guide will show you how to use Jetpack Compose (for Android) and Flutter to make a more complex custom loading animation for mobile apps. The goal is to make a fun-to-watch multi-ring spinner animation that spins in different directions, at different speeds, and with arcs of different shapes. Your UI will look fresh and new with this.
⭐ Why It’s Important to Have a Custom Loading Animation
A good loading animation will give you
More interaction with users
Different looks for each brand
There are no issues when you switch screens.
It feels like a premium app.
People believe they don’t have to wait as long.
You can make complicated animated parts with very little code using Jetpack Compose and Flutter, two modern UI frameworks.
Jetpack Compose for Android lets you make your own loading animation.
Developers can make UI in a declarative way with Jetpack Compose and use powerful APIs to add animations. We want to make a spinner with a lot of rings that are stacked on top of each other and spin by themselves.
1. Model for Setting Up a Ring
First, we discuss the features of each animated ring:
Radius
Color
Stroke width
Opacity
Arc length
Direction of rotation
Rotation speed
These properties allow full customization for each ring in the spinner.
RingConfig Model
data class RingConfig(
    val id: String,
    val radius: Float,
    val color: Color,
    val strokeWidth: Float,
    val opacity: Float,
    val arcLength: Float,
    val direction: Int,     // +1 or -1
    val speed: Float        // seconds per rotation
)
2. Creating the Custom Loading Animation
For smooth animations that never end, Compose has rememberInfiniteTransition.
Each ring has its own float animation that shows how it turns:
Independent rotation for each ring
Control over speed and direction
Smooth, continuous animation
3. Drawing on a Canvas
There are dashed arcs and a rotating effect on the rings drawn on Canvas.
This setup allows:
Changeable radius
Stroke width that can be changed
Dividing arcs into parts
Each layer can move by itself.
These pieces work together to make a loading animation that looks great and works well with Android apps that are up to date.
Spinner Composable Function
@Composable
fun Loading(
    rings: List,
    size: Dp = 400.dp
) {
    //  All animations must be created here, NOT inside Canvas
    val transition = rememberInfiniteTransition()

    // Pre-calc animations for each ring
    val rotations = rings.map { ring ->
        transition.animateFloat(
            initialValue = 0f,
            targetValue = ring.direction * 360f,
            animationSpec = infiniteRepeatable(
                animation = tween(
                    durationMillis = (ring.speed * 1000).toInt(),
                    easing = LinearEasing
                ),
                repeatMode = RepeatMode.Restart
            )
        )
    }

    Box(
        modifier = Modifier.size(size),
    ) {
        Canvas(modifier = Modifier.fillMaxSize()) {

            val center = Offset(this.size.width / 2, this.size.height / 2)

            rings.forEachIndexed { index, ring ->
                val rotation = rotations[index].value

                val circumference = 2f * PI.toFloat() * ring.radius
                val dashArray = circumference * ring.arcLength
                val dashGap = circumference - dashArray

                rotate(rotation, pivot = center) {
                    drawCircle(
                        color = ring.color.copy(alpha = ring.opacity),
                        radius = ring.radius,
                        center = center,
                        style = Stroke(
                            width = ring.strokeWidth,
                            cap = StrokeCap.Round,
                            pathEffect = PathEffect.dashPathEffect(
                                floatArrayOf(dashArray, dashGap),
                                phase = 0f
                            )
                        )
                    )
                }
            }
        }
    }
}
How to use this Loading Composable Function
MainActivity.kt
class MainActivity : ComponentActivity() {
    override fun onCreate(savedInstanceState: Bundle?) {
        super.onCreate(savedInstanceState)
        enableEdgeToEdge()
        setContent {
            LoaderTheme {
                CustomSpinLoading()
            }
        }
    }
}

@Composable
fun CustomSpinLoading() {
    val rings = listOf(
        RingConfig(
            id = "a",
            radius = 50f,
            color = Color.Black,
            strokeWidth = 14f,
            opacity = 1f,
            arcLength = 0.6f,
            direction = -1,
            speed = 6f
        ),
        RingConfig(
            id = "b",
            radius = 80f,
            color = Color.Red,
            strokeWidth = 14f,
            opacity = 1f,
            arcLength = 0.8f,
            direction = 1,
            speed = 8f
        ),
        RingConfig(
            id = "c",
            radius = 120f,
            color = Color.Blue,
            strokeWidth = 14f,
            opacity = 0.9f,
            arcLength = 0.6f,
            direction = -1,
            speed = 9f
        ),
        RingConfig(
            id = "d",
            radius = 160f,
            color = Color.Green,
            strokeWidth = 14f,
            opacity = 0.8f,
            arcLength = 0.5f,
            direction = 1,
            speed = 9f
        ),

        RingConfig(
            id = "e",
            radius = 200f,
            color = Color.Cyan,
            strokeWidth = 14f,
            opacity = 0.8f,
            arcLength = 0.4f,
            direction = -1,
            speed = 8f
        )
    )

    Loading(rings = rings, size = 400.dp)
}
🟩 Flutter Loading Animation That You Can Change
Flutter has its own animation system that is based on controllers and custom painters, but it works in a similar way to declarative programming.
Check out the code below:
RingConfig.dart Model Class
class RingConfig {
final String id;
final double radius;
final Color color;
final double strokeWidth;
final double opacity;
final double arcLength;
final int direction; // +1 or -1
final double speed; // seconds per rotation

RingConfig({
required this.id,
required this.radius,
required this.color,
required this.strokeWidth,
required this.opacity,
required this.arcLength,
required this.direction,
required this.speed,
});
}
Drawing with CustomPainter
import 'dart:math';
import 'package:flutter/cupertino.dart';
import 'RingConfig.dart';

class LoadingPainter extends CustomPainter {
final List<RingConfig> rings;
final List<Animation<double>> rotations;

LoadingPainter(this.rings, this.rotations);

@override
void paint(Canvas canvas, Size size) {
final center = Offset(size.width / 2, size.height / 2);

for (int i = 0; i < rings.length; i++) {
final ring = rings[i];
final rotation = rotations[i].value;

final paint = Paint()
..color = ring.color.withValues()
..style = PaintingStyle.stroke
..strokeWidth = ring.strokeWidth
..strokeCap = StrokeCap.round;

final circumference = 2 * pi * ring.radius;
final dashLength = circumference * ring.arcLength;
final dashGap = circumference - dashLength;

final circlePath = Path()
..addOval(Rect.fromCircle(center: center, radius: ring.radius));

final dashedPath = _dashPath(circlePath, dashLength, dashGap);

canvas.save();
canvas.translate(center.dx, center.dy);
canvas.rotate(rotation * pi / 180);
canvas.translate(-center.dx, -center.dy);

canvas.drawPath(dashedPath, paint);

canvas.restore();
}
}

@override
bool shouldRepaint(covariant CustomPainter oldDelegate) => true;
}

Path _dashPath(Path source, double dashLength, double dashGap) {
final Path dest = Path();
double distance = 0.0;

for (final metric in source.computeMetrics()) {
while (distance < metric.length) {
final next = distance + dashLength;
dest.addPath(metric.extractPath(distance, next), Offset.zero);
distance = next + dashGap;
}
distance = 0.0;
}
return dest;
}
You can make a loading animation just for mobile apps (Jetpack Compose and Flutter), and it can be very rewarding. Both frameworks give developers everything they need to make motion graphics that are expressive without having to use animated assets or libraries from other companies.
This multi-ring spinner is a great example of:
Design of animations that can be changed
Framework-level APIs for drawing
Animation loops that go on forever and work well
Consistency between platforms
A well-designed loader can make your user interface a lot better, whether you’re making apps just for Android or for more than one platform.
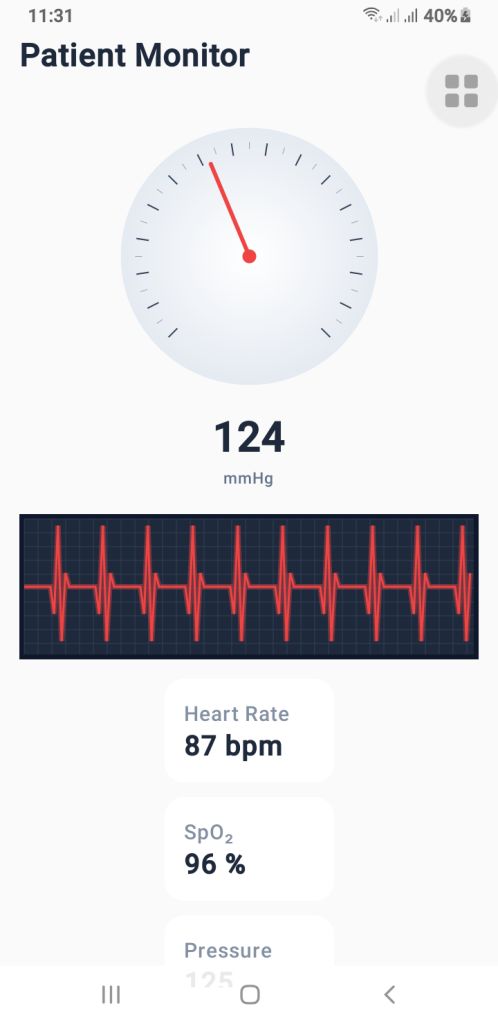
Modern health applications—whether you’re building a blood pressure app Android, an ECG app Android, or a heart rate monitor Android—require interfaces that are clean, smooth, and capable of updating in real time. With Jetpack Compose, Android developers can design advanced animated dashboards using only a few composable functions.
In this guide, we’ll walk through a complete real-time vital monitoring UI built entirely with Canvas, animations, and Jetpack Compose.
The final setup includes:
A pressure gauge (mmHg) for blood pressure visualization
A real-time ECG waveform renderer
A vital simulator that generates dynamic heartbeat, SpO₂, and pressure values
If you’re creating a health monitoring interface, these components provide a great foundation.
1. The Blood Pressure Gauge’s (PressureGauge) user interface
The PressureGauge composable makes a round gauge that is fully animated and looks like the dials on professional sphygmomanometers used in clinics.
Important parts of the gauge
The needle moves smoothly.
It ticks every 10 mmHg.
Major ticks every 20 mmHg.
A soft radial gradient background.
A 270° sweep (–135° to +135°), just like a medical pressure meter.
The needle moves smoothly toward the new pressure value when you use animateFloatAsState(). This makes it feel like a real machine, which is great for the UI of an Android blood pressure app.
PressureGauge Code
@Composable
fun PressureGauge(
    pressure: Float,
    maxPressure: Float = 300f,
    modifier: Modifier = Modifier
) {
    val animatedPressure by animateFloatAsState(
        targetValue = pressure,
        animationSpec = tween(800, easing = LinearOutSlowInEasing)
    )

    val size = 260.dp
    val center = size / 2

    Box(
        modifier = modifier
            .size(size)
            .padding(12.dp),
        contentAlignment = Alignment.Center
    ) {
        Canvas(modifier = Modifier.fillMaxSize()) {

            val w = this.size.width
            val h = this.size.height
            val cx = w / 2
            val cy = h / 2

            val rotation = -135f + (animatedPressure.coerceAtMost(maxPressure) / maxPressure) * 270f

            // BACKGROUND GRADIENT
            drawCircle(
                brush = Brush.radialGradient(
                    colors = listOf(Color.White, Color(0xFFE2E8F0))
                ),
                radius = w * 0.45f,
                center = Offset(cx, cy)
            )

            // TICKS
            for (i in 0..maxPressure.toInt() step 10) {
                val angle = -135f + (i / maxPressure) * 270f
                val rad = Math.toRadians((angle - 90).toDouble())

                val major = i % 20 == 0
                val length = if (major) 18f else 10f
                val width = if (major) 2f else 1f

                val rOuter = w * 0.4f
                val rInner = rOuter - length

                val x1 = cx + rOuter * cos(rad).toFloat()
                val y1 = cy + rOuter * sin(rad).toFloat()
                val x2 = cx + rInner * cos(rad).toFloat()
                val y2 = cy + rInner * sin(rad).toFloat()

                drawLine(
                    color = if (major) Color(0xFF334155) else Color(0xFF94A3B8),
                    start = Offset(x1, y1), end = Offset(x2, y2),
                    strokeWidth = width
                )
            }

            // NEEDLE
            rotate(rotation, pivot = Offset(cx, cy)) {
                drawLine(
                    start = Offset(cx, cy),
                    end = Offset(cx, cy - w * 0.35f),
                    color = Color(0xFFEF4444),
                    strokeWidth = 6f,
                    cap = StrokeCap.Round
                )
                drawCircle(
                    color = Color(0xFFEF4444),
                    center = Offset(cx, cy),
                    radius = 10f
                )
            }
        }
    }

    Column(horizontalAlignment = Alignment.CenterHorizontally) {
        Text(
            text = animatedPressure.toInt().toString(),
            fontSize = 34.sp,
            fontWeight = FontWeight.Bold,
            color = Color(0xFF1E293B)
        )
        Text(
            text = "mmHg",
            color = Color(0xFF64748B),
            fontSize = 12.sp
        )
    }
}
2. PulseECG – A real-time renderer for ECG waveforms
The waveform is the most important visual part of an ECG app for Android. The PulseECG composable makes it look like an ECG trace is moving by constantly moving a list of points. How it works
Keeps a list of 120 points that keeps changing
Changes values based on two conditions:
active: ECG is working
beating: heartbeats
Makes a dark grid that looks like a medical one
Draws a glowing red ECG path to make it look real
It looks a lot like real ECG monitor output and can easily take real medical data.
PulseECG Code
@Composable
fun PulseECG(
    active: Boolean,
    beating: Boolean,
    modifier: Modifier = Modifier
) {
    var points by remember { mutableStateOf(List(120) { 50f }) }
    var tick by remember { mutableStateOf(0) }

    LaunchedEffect(active, beating) {
        while (true) {
            delay(40)

            val new = points.toMutableList()
            new.removeAt(0)

            val updated = when {
                !active -> 50f
                !beating -> 50f + (Math.random().toFloat() - 0.5f) * 8f
                else -> when (tick % 12) {
                    0 -> 50f
                    1 -> 30f
                    2 -> 95f
                    3 -> 10f
                    4 -> 60f
                    else -> 50f
                }
            }
            new.add(updated)
            points = new

            if (beating) tick++
        }
    }

    Canvas(
        modifier = modifier
            .fillMaxWidth()
            .height(110.dp)
            .background(Color(0xFF0F172A))
            .padding(4.dp)
    ) {
        val w = size.width
        val h = size.height

        // GRID
        drawRect(Color(0xFF1E293B))
        for (x in 0 until w.toInt() step 20)
            drawLine(Color(0xFF334155), Offset(x.toFloat(), 0f), Offset(x.toFloat(), h))
        for (y in 0 until h.toInt() step 20)
            drawLine(Color(0xFF334155), Offset(0f, y.toFloat()), Offset(w, y.toFloat()))

        // ECG line
        val path = Path()
        points.forEachIndexed { i, v ->
            val x = (i / points.size.toFloat()) * w
            val y = h - (v / 100f) * h
            if (i == 0) path.moveTo(x, y) else path.lineTo(x, y)
        }

        // Glow
        drawPath(
            path = path,
            color = Color(0xFFEF4444).copy(alpha = 0.4f),
            style = Stroke(width = 8f)
        )

        drawPath(
            path = path,
            color = Color(0xFFEF4444),
            style = Stroke(width = 3f)
        )

    }
}
3. VitalSimulator – Generating Real-Time Readings
For demo purposes—or previewing UI—you can use VitalSimulator, a small composable that generates random:
Blood pressure
Heart rate (BPM)
SpO₂ oxygen level
This is especially useful while building a heart rate monitor Android interface.
VitalSimulator Code
@Composable
fun VitalSimulator(): Triple<Float, Float, Float> {
    var pressure by remember { mutableStateOf(120f) }
    var bpm by remember { mutableStateOf(75f) }
    var spo2 by remember { mutableStateOf(97f) }

    LaunchedEffect(Unit) {
        while (true) {
            delay(1500)
            pressure = (110..135).random().toFloat()
            bpm = (72..90).random().toFloat()
            spo2 = (96..99).random().toFloat()
        }
    }

    return Triple(pressure, bpm, spo2)
}
Putting It All Together
By combining these composables, you can build a polished dashboard showing:
Animated blood pressure
Real-time ECG waveform
BPM and SpO₂ levels
This is an excellent base for medical-style dashboards or consumer wellness applications.
Jetpack Compose makes it possible to build real-time health monitoring dashboards with only a few clean, efficient composables. Whether you’re working on a blood pressure app Android, an ECG app Android, or a heart rate monitor Android, these components give you a professional, animated, and scalable UI foundation.
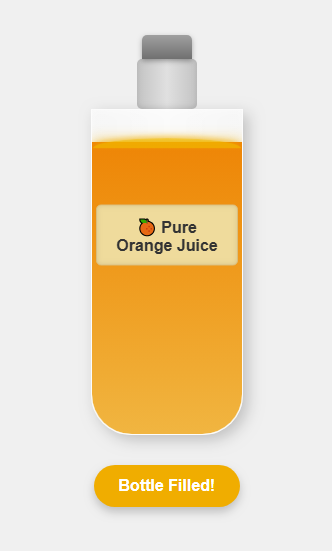
Animations make websites more engaging, and small micro-interactions can add a big impact to the user experience. One fun example is a Bottle Juice Fill Animation — a smooth effect that visually fills a bottle with juice using only HTML, CSS, and JavaScript.
✨ Why This Animation Stands Out
Lightweight: No frameworks or libraries required.
Interactive: The fill level can be adjusted dynamically with JavaScript.
Eye-catching: A perfect micro-animation for portfolios, landing pages, or product sites.
Modern: Works in all major browsers.
💻 How It Works
HTML provides the bottle structure.
CSS creates the bottle shape and smooth filling effect.
JavaScript controls the fill percentage and triggers the animation.
This combination results in a physics-inspired, satisfying animation that looks great in modern UI design.
If you think making money on Fiverr requires you to be a professional graphic designer, programmer, or marketer, think again! With the Fiverr Affiliate Program, you can earn passive income even if you don’t have any technical skills. This method involves promoting Fiverr’s services to potential customers and earning a commission for every successful purchase made through your unique affiliate link.
Whether you are a student, stay-at-home parent, or simply someone looking for a side income, Fiverr’s affiliate system is an easy way to monetize your online presence.
What is the Fiverr Affiliate Program?
The Fiverr Affiliate Program allows you to promote Fiverr’s services to others. When someone clicks your affiliate link and purchases a service (also called a “gig”), you earn a commission. The commission rates vary based on the category of service, with some paying up to $150 per sale.
Key Features of Fiverr Affiliate Program:
Free to join — no upfront investment.
Wide range of services to promote (over 500+ categories).
High commission rates on specific niches.
Real-time tracking dashboard for your performance.
Why Fiverr Affiliate is Perfect for Beginners
You don’t need to:
Provide services yourself.
Have advanced skills.
Create products or courses.
Instead, you only need to focus on promoting Fiverr services that people already need.
Example: If someone needs a logo designer, instead of designing it yourself, you share a Fiverr gig link to a professional designer. If they order, you earn a commission.
Step-by-Step Guide to Earning from Fiverr Affiliate Without Any Skill
Create a free account and fill in the required details.
Once approved, you’ll get access to your unique affiliate links.
2. Choose a Profitable Niche
While you can promote all Fiverr services, focusing on one niche makes your marketing more effective. Examples:
Logo design
Website development
Social media marketing
Video editing
Resume writing
3. Find High-Quality Gigs to Promote
Browse Fiverr and select sellers with:
High ratings (4.9 stars or above)
Positive reviews
Professional portfolios
Copy the gig’s link, then generate your affiliate link through the Fiverr affiliate dashboard.
4. Promote Your Affiliate Links
You can promote Fiverr gigs through:
Blogging: Write helpful articles and include your affiliate link.
YouTube: Create review or tutorial videos.
Social Media: Share valuable Fiverr gigs on Facebook, Instagram, Twitter, or LinkedIn.
Forums & Communities: Answer questions on Quora or Reddit with relevant Fiverr links.
Email Marketing: Send gig recommendations to your email subscribers.
5. Use SEO to Get Free Traffic
Optimizing your content for search engines helps people find you when searching for services. SEO Tips:
Include target keywords like “Fiverr affiliate program,” “earn money without skills,” “work from home with Fiverr.”
Use headings (H1, H2, H3) properly.
Add meta descriptions with keywords.
Use high-quality, relevant images with alt text.
Tips to Increase Your Fiverr Affiliate Earnings
Create comparison articles — e.g., “Best Logo Designers on Fiverr.”
Offer bonuses to people who purchase through your link.
Target long-tail keywords for higher conversions.
Share real examples of Fiverr work to build trust.
Conclusion
You don’t need technical skills to make money online. With the Fiverr Affiliate Program, you can earn by simply recommending services people already want. The more targeted traffic you drive to your affiliate links, the more passive income you can generate.
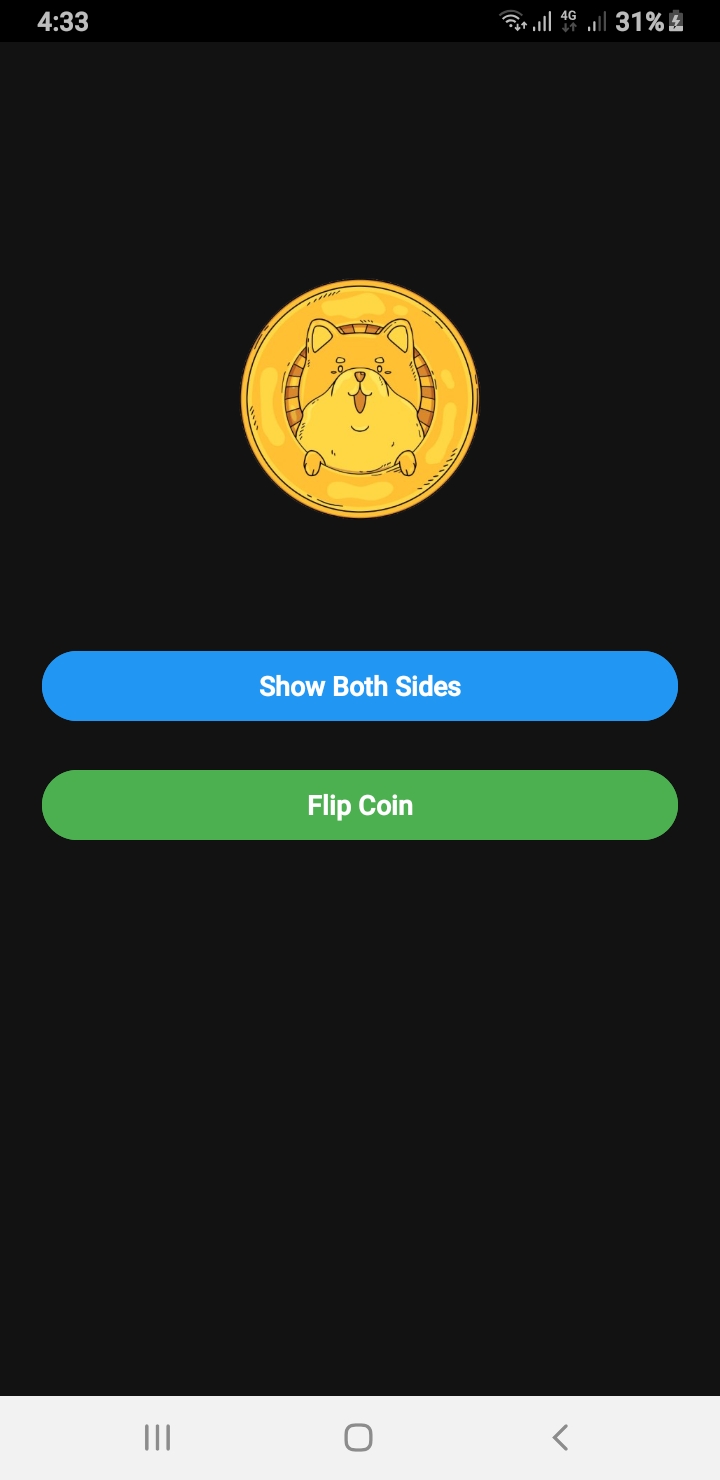
If you are searching for a Flip Coin Source Code Android example, this guide will walk you through building a realistic coin flip animation in Android using Java. This example includes sound effects, both sides of the coin visible during flipping, and a clean user interface built with ConstraintLayout.
Why Use This Flip Coin Source Code Android Example?
This project is perfect for beginners and intermediate developers who want to learn about animations, MediaPlayer usage, and responsive layouts. Whether you are creating a decision-making app, a fun game, or just experimenting with Android animations, this Flip Coin Source Code Android will save you time and effort.
Flip Coin Source Code Android – MainActivity.java
public class MainActivity extends AppCompatActivity {

    ImageView coinImage;
    Button btnShowSides, btnFlip;
    int side = 0;

    @Override
    protected void onCreate(Bundle savedInstanceState) {
        super.onCreate(savedInstanceState);
        setContentView(R.layout.activity_main);
        ViewCompat.setOnApplyWindowInsetsListener(findViewById(R.id.main), (v, insets) -> {
            Insets systemBars = insets.getInsets(Type.systemBars());
            v.setPadding(systemBars.left, systemBars.top, systemBars.right, systemBars.bottom);
            return insets;
        });
        // Set status bar color to black
        getWindow().setStatusBarColor(ContextCompat.getColor(this, R.color.black));

        coinImage = findViewById(R.id.coinImage);
        btnShowSides = findViewById(R.id.btnShowSides);
        btnFlip = findViewById(R.id.btnFlip);
        coinImage.setImageResource(R.drawable.head); //  Set initial image
        btnFlip.setEnabled(true);

        btnShowSides.setOnClickListener(view -> {
            showBothSidesInstant();

        });

        btnFlip.setOnClickListener(view -> flipCoinRealistically());
    }


    private void showBothSidesInstant() {
        if (side == 0) {
            coinImage.setImageResource(R.drawable.tail);
            side = 1;
        } else {
            coinImage.setImageResource(R.drawable.head);
            side = 0;
        }
    }

    private void flipCoinRealistically() {
        boolean isHeads = new Random().nextBoolean();

        // Optional: play coin flip sound
        MediaPlayer mp = MediaPlayer.create(this, R.raw.coin_sound);
        mp.start();
        mp.setOnCompletionListener(MediaPlayer::release);

        // Track which side is showing
        final boolean[] showingHeads = {true};

        // Listener to change image mid-flip
        ValueAnimator flipAnimator = ValueAnimator.ofFloat(0f, 1f);
        flipAnimator.setDuration(5000); // total time
        flipAnimator.setInterpolator(new LinearInterpolator());
        flipAnimator.addUpdateListener(animation -> {
            float progress = (float) animation.getAnimatedValue();
            float totalRotation = progress * 4320f; // 12 full flips (10 fast + 2 slow)
            coinImage.setRotationX(totalRotation);

            // At every 180°, swap image
            if ((int) (totalRotation / 180) % 2 == 0 && !showingHeads[0]) {
                coinImage.setImageResource(R.drawable.head);
                showingHeads[0] = true;
            } else if ((int) (totalRotation / 180) % 2 != 0 && showingHeads[0]) {
                coinImage.setImageResource(R.drawable.tail);
                showingHeads[0] = false;
            }
        });

        // When done, show final result
        flipAnimator.addListener(new AnimatorListenerAdapter() {
            @Override
            public void onAnimationEnd(Animator animation) {
                coinImage.setRotationX(0f);
                coinImage.setImageResource(isHeads ? R.drawable.head : R.drawable.tail);
            }
        });

        flipAnimator.start();
    }

}
Flip Coin Source Code Android – XML Layout (activity_main.xml)