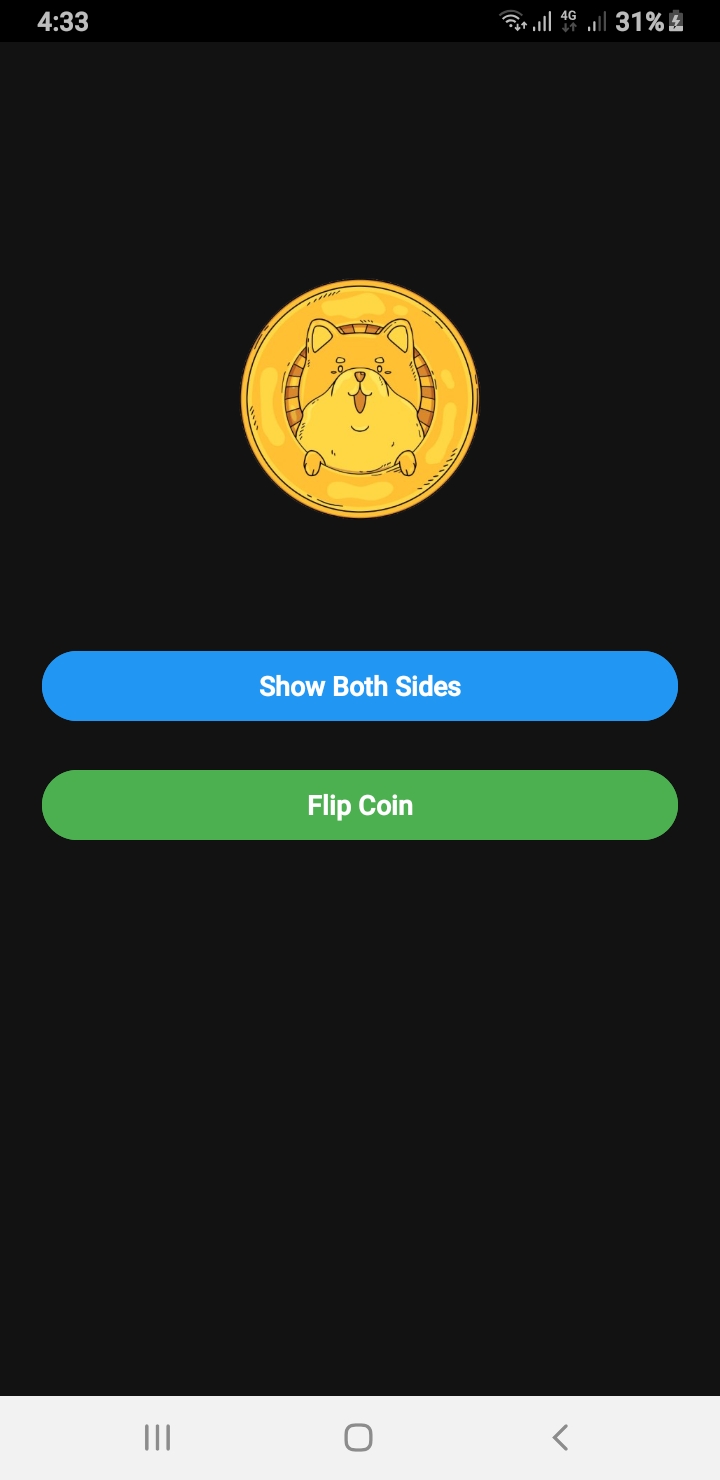
If you are searching for a Flip Coin Source Code Android example, this guide will walk you through building a realistic coin flip animation in Android using Java. This example includes sound effects, both sides of the coin visible during flipping, and a clean user interface built with ConstraintLayout.
Why Use This Flip Coin Source Code Android Example?
This project is perfect for beginners and intermediate developers who want to learn about animations, MediaPlayer usage, and responsive layouts. Whether you are creating a decision-making app, a fun game, or just experimenting with Android animations, this Flip Coin Source Code Android will save you time and effort.
Flip Coin Source Code Android – MainActivity.java
public class MainActivity extends AppCompatActivity {

    ImageView coinImage;
    Button btnShowSides, btnFlip;
    int side = 0;

    @Override
    protected void onCreate(Bundle savedInstanceState) {
        super.onCreate(savedInstanceState);
        setContentView(R.layout.activity_main);
        ViewCompat.setOnApplyWindowInsetsListener(findViewById(R.id.main), (v, insets) -> {
            Insets systemBars = insets.getInsets(Type.systemBars());
            v.setPadding(systemBars.left, systemBars.top, systemBars.right, systemBars.bottom);
            return insets;
        });
        // Set status bar color to black
        getWindow().setStatusBarColor(ContextCompat.getColor(this, R.color.black));

        coinImage = findViewById(R.id.coinImage);
        btnShowSides = findViewById(R.id.btnShowSides);
        btnFlip = findViewById(R.id.btnFlip);
        coinImage.setImageResource(R.drawable.head); //  Set initial image
        btnFlip.setEnabled(true);

        btnShowSides.setOnClickListener(view -> {
            showBothSidesInstant();

        });

        btnFlip.setOnClickListener(view -> flipCoinRealistically());
    }


    private void showBothSidesInstant() {
        if (side == 0) {
            coinImage.setImageResource(R.drawable.tail);
            side = 1;
        } else {
            coinImage.setImageResource(R.drawable.head);
            side = 0;
        }
    }

    private void flipCoinRealistically() {
        boolean isHeads = new Random().nextBoolean();

        // Optional: play coin flip sound
        MediaPlayer mp = MediaPlayer.create(this, R.raw.coin_sound);
        mp.start();
        mp.setOnCompletionListener(MediaPlayer::release);

        // Track which side is showing
        final boolean[] showingHeads = {true};

        // Listener to change image mid-flip
        ValueAnimator flipAnimator = ValueAnimator.ofFloat(0f, 1f);
        flipAnimator.setDuration(5000); // total time
        flipAnimator.setInterpolator(new LinearInterpolator());
        flipAnimator.addUpdateListener(animation -> {
            float progress = (float) animation.getAnimatedValue();
            float totalRotation = progress * 4320f; // 12 full flips (10 fast + 2 slow)
            coinImage.setRotationX(totalRotation);

            // At every 180°, swap image
            if ((int) (totalRotation / 180) % 2 == 0 && !showingHeads[0]) {
                coinImage.setImageResource(R.drawable.head);
                showingHeads[0] = true;
            } else if ((int) (totalRotation / 180) % 2 != 0 && showingHeads[0]) {
                coinImage.setImageResource(R.drawable.tail);
                showingHeads[0] = false;
            }
        });

        // When done, show final result
        flipAnimator.addListener(new AnimatorListenerAdapter() {
            @Override
            public void onAnimationEnd(Animator animation) {
                coinImage.setRotationX(0f);
                coinImage.setImageResource(isHeads ? R.drawable.head : R.drawable.tail);
            }
        });

        flipAnimator.start();
    }

}
Flip Coin Source Code Android – XML Layout (activity_main.xml)
Looking to build a fun and engaging spin-the-wheel app for giveaways, lucky draws, games, or random selections? This post covers a complete mini wheel spinner app built with:
✅ Android Java using Custom Views
✅ Android Jetpack Compose
✅ Cross-platform Flutter (Android, iOS, and Web)
It’s lightweight, beautifully animated, and perfect for learners and developers. Whether you’re creating a decision-maker app or adding gamification to your product — this is your go-to solution.
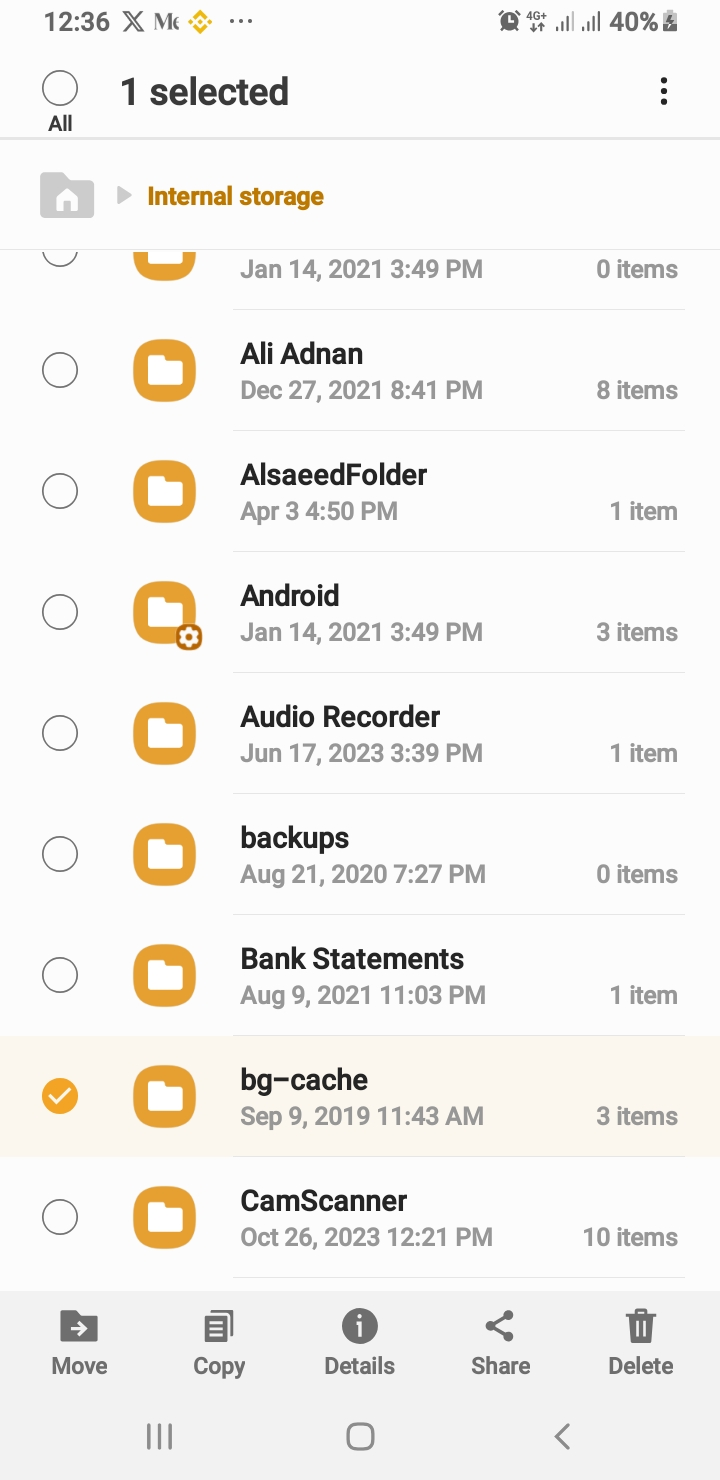
Looking for a production-ready Android file manager app source code written in Java? Look no further! File Manager Pro is a clean, fully functional, open-source file explorer built using modern development practices. It’s perfect for developers who want to learn, customize, or extend a real-world Android file manager project.
🚀 Key Features
✅ Browse files and folders with a responsive UI
✅ Toggle show/hide hidden files support
✅ Multi-select with bottom menu actions: Copy, Move, Delete
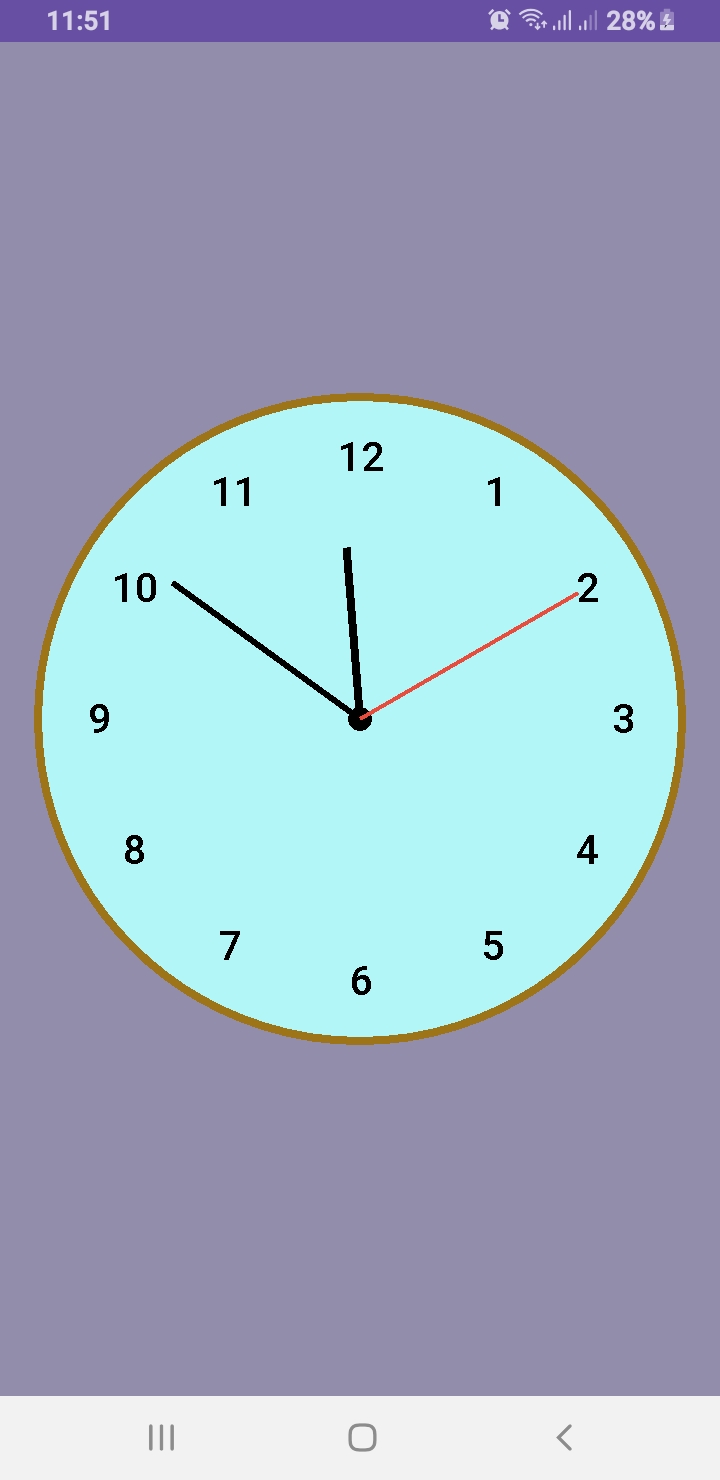
Want to design a custom analog clock in Android? In this post, you’ll learn how to create one using both Java and Kotlin. Whether you’re building a utility app, dashboard UI, or simply improving your UI skills, this is the perfect project to implement a working analog clock in Android.
🎯 What’s Inside This Project?
You’ll get the complete source code for both languages, canvas-based drawing, second-by-second ticking hands, and a beautiful rounded design. Let’s dive into development!
✅ What You’ll Learn
How to draw a custom analog clock using Canvas
Java and Kotlin implementations side by side
Center dot, circular frame, and dynamic ticking hands
Modern, responsive UI layout for all screen sizes
This article provides two versions: AnalogClockView.java and AnalogClockViewKotlin.kt. You can use either based on your language preference.
📄 XML Layout
To use the custom clock in your activity, add this to your activity_main.xml:
Creating a custom analog clock in Android is a great way to explore Canvas drawing, custom views, and elegant UI development. Whether you choose Java or Kotlin, the outcome is a clean and dynamic clock component ready for your next project.
We used the Paint class extensively to draw shapes and text on the canvas. To learn more about its capabilities, see the official documentation here:
🔗 Android Developers
Don’t forget to share and follow Al Saeed for more hands-on Android tutorials.
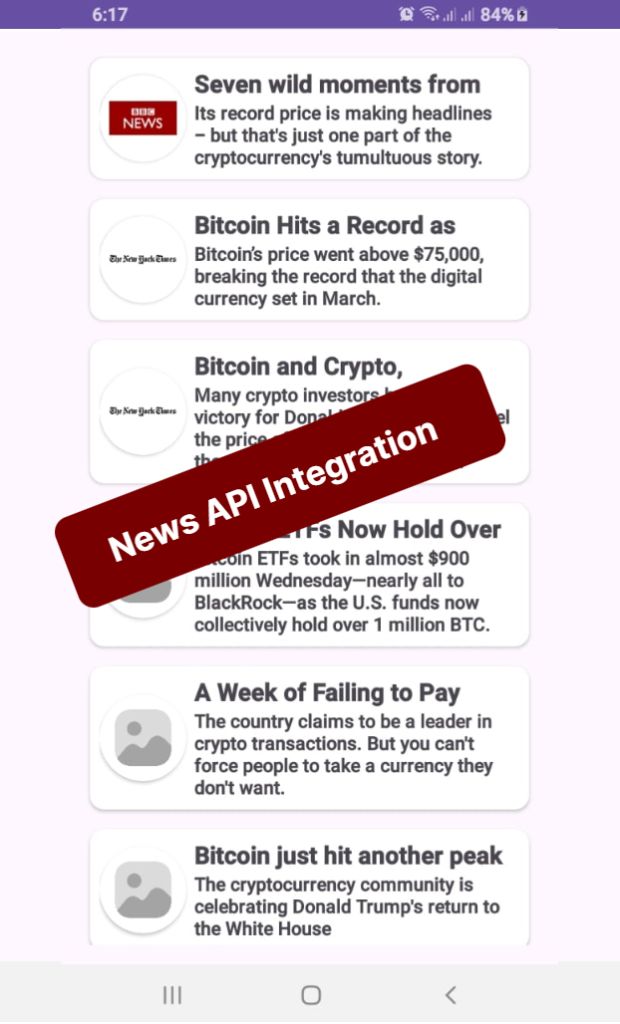
In today’s mobile-first world, delivering real-time content quickly and smoothly is crucial for user engagement. In this tutorial on News API Integration In Android App Java, you’ll learn how to fetch and display news articles in an Android app using Retrofit, RecyclerView, and ProgressBar, while implementing an infinite scroll feature — all written in Java.
By the end of this guide, you will have a working news app that fetches the latest articles based on a search query and loads more content as the user scrolls down.
🚀 Key Components We’ll Use
RecyclerView — To display news articles in a scrollable list.
ProgressBar — To show loading status while fetching data.
Retrofit — For efficient and safe API calls.
Infinite Scrolling — Load more news automatically when the user reaches the end.
Handler — To simulate slight loading delays during pagination.
🔧 Step-by-Step Implementation
1. Setting Up RecyclerView
First, we initialize our RecyclerView and set up a custom NewsAdapter to bind news articles dynamically.
By combining Retrofit, RecyclerView, and ProgressBar, we’ve built a highly efficient, real-time news app that supports infinite scrolling in Android using Java.
This pattern is extremely useful for creating news apps, social media feeds, blogs, and any app that requires real-time content loading.
Pro Tip: Always handle error cases smartly (like no internet, API limit errors) to enhance user experience even further.
Introduction
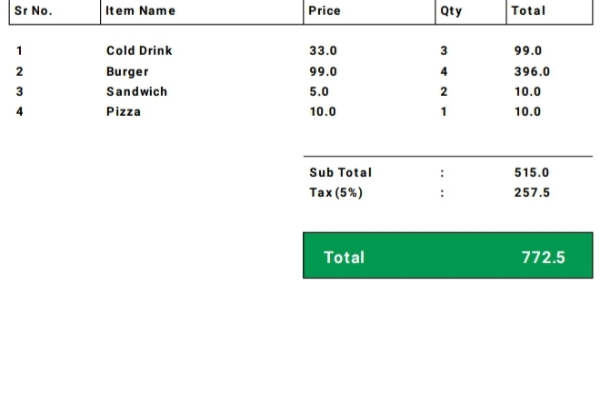
In this tutorial, we will explore how to develop a Barcode Scanner Invoice Generator App in Android Java that allows users to scan barcodes, add products to a list, and generate a PDF invoice. This app is ideal for small businesses or retail stores that need a quick and efficient way to manage transactions. By the end of this guide, you’ll be able to build a fully functional barcode scanner invoice generator app using modern Android development tools.
Prerequisites
Before getting started, ensure you have the following:
Android Studio installed
Basic knowledge of Java/Kotlin
Dependencies for barcode scanning and PDF generation
Step 1: Adding Dependencies
To enable barcode scanning and PDF generation, add the following dependencies to your build.gradle file:
By following these steps, you can build a functional Android application that scans barcodes, lists products in a RecyclerView, and generates a PDF invoice. This project is highly useful for businesses looking for an easy invoicing system within their Android app.
If you’re looking to build an Android Image Compressor App with Image Picker that lets users select, compress, and save images directly to their device, you’re in the right place. In this tutorial, we’ll walk you through how to create an Android image compression tool using Java, ActivityResultLauncher, SeekBar, and a multithreaded approach for performance.
🔧 What This App Does
Select images using the modern Image Picker API
Display original and compressed images
Adjust compression quality via SeekBar
Save compressed images to external storage
Optimize image processing using ExecutorService
🚀 Step-by-Step Breakdown
1. Image Selection Using ActivityResultLauncher
The app uses ActivityResultContracts.PickVisualMedia() to allow users to select an image from their gallery. Once an image is picked, it’s displayed in the original image view using:
A SeekBar allows users to set the compression level in real-time. The compressionQuality variable updates with each user interaction, and the value is shown dynamically using a TextView.
To keep the UI responsive, the app uses ExecutorService to handle compression on a background thread. This ensures the main thread isn’t blocked while processing images.
Once an image is compressed, users can tap a button to save it into the Pictures/CompressedImages folder. The file is written using FileOutputStream, and then registered in the device gallery.
addImageToGallery(file);
5. Displaying the Result
The app shows both the original and compressed image side by side, allowing users to visually compare them. A progress bar is used to indicate when compression is happening in the background.
🧠 Key Concepts Used
Bitmap Compression with Bitmap.compress()
Multithreading with Executors.newFixedThreadPool()
Modern Media Picker with ActivityResultContracts
Storage Access with Environment.getExternalStoragePublicDirectory()
Gallery Update via MediaStore
🛡️ Final Touch: Cleanup
Always remember to shut down the ExecutorService when the activity is destroyed to prevent memory leaks:
public class MainActivity extends AppCompatActivity {
private Button btnImagesSelect, btnSaveImages, btnCompressImages;
private TextView tvSeekValue;
private SeekBar compressionSeekBar;
private int compressionQuality = 100; // Default to 100%
ImageModel imageModel;
private ImageView originalImageView, compressedImageView;
private ProgressBar progressBar;
private final ExecutorService executorService = Executors.newFixedThreadPool(2);
ActivityResultLauncher pickMultipleMedia =
registerForActivityResult(new ActivityResultContracts.PickVisualMedia(), uri -> {
if (uri != null) {
// Handle the selected media URI (image or video)
Log.d("Selected URI", uri.toString());
setImageInImageView(uri);
} else {
Log.d("PickMedia", "No media selected");
}
});
@Override
protected void onCreate(Bundle savedInstanceState) {
super.onCreate(savedInstanceState);
setContentView(R.layout.activity_main);
originalImageView = findViewById(R.id.originalImageView);
compressedImageView = findViewById(R.id.compressedImageView);
btnImagesSelect = findViewById(R.id.selectImagesButton);
btnSaveImages = findViewById(R.id.saveImagesButton);
btnCompressImages = findViewById(R.id.compressImages);
compressionSeekBar = findViewById(R.id.compressionSeekBar);
tvSeekValue = findViewById(R.id.tvSeekValue);
progressBar = findViewById(R.id.progressBar);
btnImagesSelect.setOnClickListener(view -> openImagePicker());
btnSaveImages.setOnClickListener(view -> saveCompressedImages());
btnCompressImages.setOnClickListener(v -> compressImagesInBackground());
compressionSeekBar.setOnSeekBarChangeListener(new SeekBar.OnSeekBarChangeListener() {
@Override
public void onProgressChanged(SeekBar seekBar, int progress, boolean fromUser) {
compressionQuality = progress;
tvSeekValue.setText("Compression: " + progress + "%");
}
@Override
public void onStartTrackingTouch(SeekBar seekBar) {
}
@Override
public void onStopTrackingTouch(SeekBar seekBar) {
}
});
}
// open image picker to pick the image
private void openImagePicker() {
 pickMultipleMedia.launch(new PickVisualMediaRequest.Builder()
    .setMediaType(ActivityResultContracts.PickVisualMedia.ImageOnly.INSTANCE)
    .build());
}
// set the selected image in the original image view
private void setImageInImageView(Uri uri) {
executorService.execute(() -> {
try {
InputStream inputStream = getContentResolver().openInputStream(uri);
Bitmap originalBitmap = BitmapFactory.decodeStream(inputStream);
imageModel = new ImageModel(originalBitmap, uri);
runOnUiThread(() -> {
originalImageView.setImageBitmap(originalBitmap);
compressedImageView.setImageBitmap(null);
});
} catch (IOException e) {
e.printStackTrace();
}
});
}
// compressed image in the background
private void compressImagesInBackground() {
progressBar.setVisibility(View.VISIBLE);
executorService.execute(() -> {
Bitmap compressedBitmap = compressImage(imageModel.getOriginalImage(), compressionQuality);
imageModel.setCompressedImage(compressedBitmap);
runOnUiThread(() -> {
compressedImageView.setImageBitmap(compressedBitmap);
progressBar.setVisibility(View.GONE);
});
});
}
//compress image method, which is calling in the compressImagesInBackground method
private Bitmap compressImage(Bitmap original, int quality) {
ByteArrayOutputStream stream = new ByteArrayOutputStream();
original.compress(Bitmap.CompressFormat.JPEG, quality, stream);
byte[] byteArray = stream.toByteArray();
return BitmapFactory.decodeByteArray(byteArray, 0, byteArray.length);
}
// save the compressed image in the phone storage
private void saveCompressedImages() {
executorService.execute(() -> {
File directory = new File(Environment.getExternalStoragePublicDirectory(Environment.DIRECTORY_PICTURES), "CompressedImages");
if (!directory.exists()) {
directory.mkdirs();
}
File file = new File(directory, "compressed_" + System.currentTimeMillis() + ".jpg");
try (FileOutputStream fos = new FileOutputStream(file)) {
imageModel.getCompressedImage().compress(Bitmap.CompressFormat.JPEG, 100, fos);
fos.flush();
addImageToGallery(file);
} catch (IOException e) {
e.printStackTrace();
}
// Show toast with full image path
runOnUiThread(() -> Toast.makeText(
this,
"Image saved at:\n" + file.getAbsolutePath(),
Toast.LENGTH_LONG
).show());
});
}
//show the image in the gallery
private void addImageToGallery(File file) {
ContentValues values = new ContentValues();
values.put(MediaStore.Images.Media.DATA, file.getAbsolutePath());
values.put(MediaStore.Images.Media.MIME_TYPE, "image/jpeg");
getContentResolver().insert(MediaStore.Images.Media.EXTERNAL_CONTENT_URI, values);
}
 @Override
protected void onDestroy() {
    super.onDestroy();
    executorService.shutdown();
}
}
📦 2. ImageModel.java – Custom Model Class for Handling Images
💡 Note: This is a reusable model class used to store and manage both the original and compressed image Bitmaps, along with the image URI. While it’s helpful for clean code and scalability, you can also work without a model class if you prefer a simpler implementation.
public class ImageModel {
    private Bitmap originalImage;
    private Bitmap compressedImage;
    private Uri imageUri;

    public ImageModel(Bitmap originalImage, Uri imageUri) {
        this.originalImage = originalImage;
        this.imageUri = imageUri;
        this.compressedImage = originalImage;
    }

    public Bitmap getOriginalImage() {
        return originalImage;
    }

    public Bitmap getCompressedImage() {
        return compressedImage;
    }

    public void setCompressedImage(Bitmap compressedImage) {
        this.compressedImage = compressedImage;
    }

    public Uri getImageUri() {
        return imageUri;
    }
}
This Android image compressor app provides a practical implementation of media handling, compression, and storage. Whether you’re building a photo editing app or simply want to reduce image size before upload, this codebase gives you a solid foundation to build on.
Looking to create a Simple Web Browser in Android Using WebView in Java that mimics Google Chrome? In this tutorial, we’ll walk you through building a full-featured, modern web browser in Java using Android Studio. This browser includes essential features like web page loading, navigation buttons, progress bar, and URL input with “GO” button support — all wrapped in a sleek UI similar to Chrome.
🔧 Features of This Android Web Browser
URL input bar with IME GO button handling
Full WebView support with JavaScript enabled
Progress bar to indicate page loading status
Back and Forward navigation buttons
Proper back press handling using OnBackPressedDispatcher
📱 MainActivity.java – Complete Code Overview
The heart of our browser lies in the MainActivity.java. Here’s what each component does:
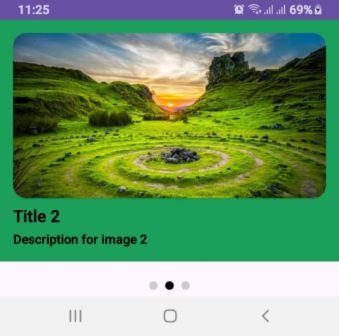
Creating a smooth and engaging user experience is crucial for any Android app. One common UI component that helps achieve this is a Professional Auto-Sliding Layout Slider In Android Java. Perfect for highlighting key features, showcasing products, or creating onboarding screens
✅ Replace static arrays with dynamic content from Firebase or REST API
✅ Use MotionLayout for more advanced transitions
✅ Customize the dot shapes and colors for better brand alignment
🚀 Final Thoughts
Using ViewPager2 with auto-scroll and dot indicators is a powerful way to deliver interactive, modern UI components in your Android app. Whether for onboarding, promotional banners, or product showcases, this slider structure is flexible, reusable, and production-ready.
Introduction
In this tutorial, we will implement a Collapsing Toolbar Layout in Android Java using AppBarLayout and NestedScrollView. The CollapsingToolbarLayout provides a smooth collapsing effect when the user scrolls through a NestedScrollView.
Prerequisites
Android Studio installed
Basic knowledge of XML and Java/Kotlin
A working Android project
Step 1: activity_main.xml
Create an activity_main.xml file with the following code:
The CollapsingToolbarLayout provides a visually appealing effect for modern UI designs. It enhances user experience by offering a smooth transition between expanded and collapsed toolbar states. You can further customize it with animations, icons, and additional widgets inside the AppBarLayout.
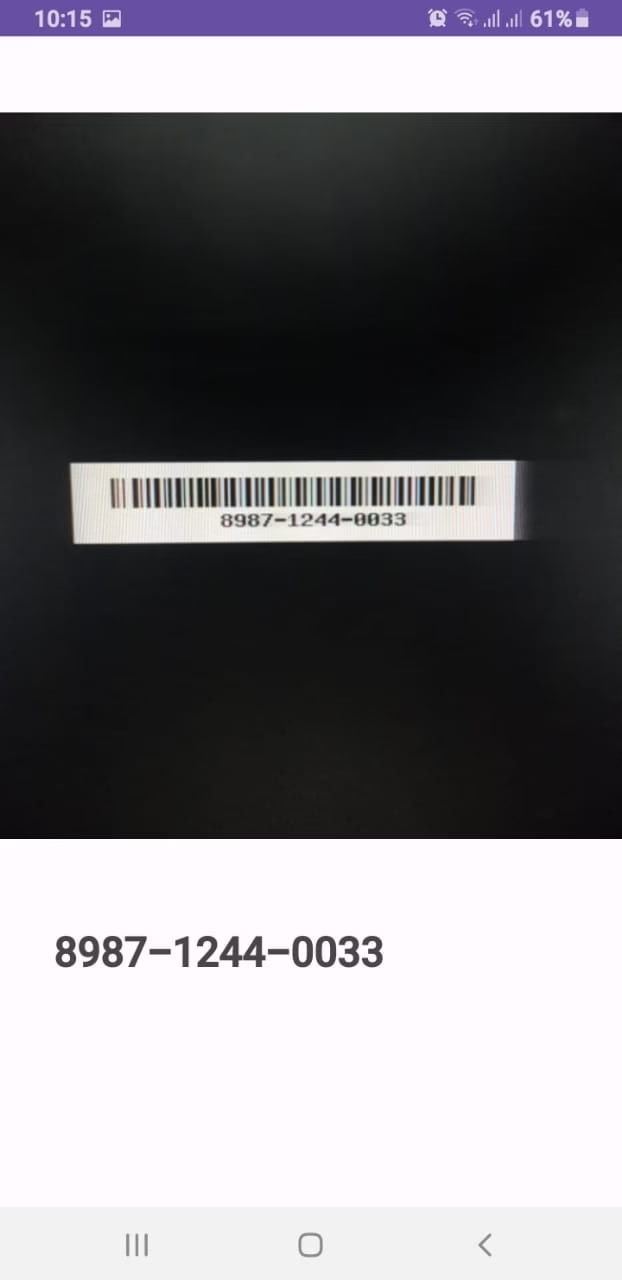
If you’re searching for a simple yet powerful way to create a Barcode Scanner App in Android Java using Android Studio, you’re in the right place! This tutorial will guide you through building a fully functional barcode and QR code scanner using Google’s Mobile Vision API and Android’s CameraSource class.
This project is ideal for retail apps, inventory management systems, attendance apps, and more.
✅ Features of This Barcode Scanner App
Real-time barcode scanning using device camera
Supports all barcode formats (QR, UPC, Data Matrix, etc.)
📄 Full Java Code for Barcode Scanner (MainActivity.java)
public class MainActivity extends AppCompatActivity {

    private SurfaceView surfaceView;
    private BarcodeDetector barcodeDetector;
    private CameraSource cameraSource;
    private static final int REQUEST_CAMERA_PERMISSION = 201;
    private ToneGenerator toneGen1;
    private TextView barcodeText;
    private String barcodeData;

    @Override
    protected void onCreate(Bundle savedInstanceState) {
        super.onCreate(savedInstanceState);
        setContentView(R.layout.activity_main);

        toneGen1 = new ToneGenerator(AudioManager.STREAM_MUSIC, 100);
        surfaceView = findViewById(R.id.surface_view);
        barcodeText = findViewById(R.id.barcode_text);

        initialiseDetectorsAndSources();
    }

    private void initialiseDetectorsAndSources() {
        barcodeDetector = new BarcodeDetector.Builder(this)
                .setBarcodeFormats(Barcode.ALL_FORMATS)
                .build();

        cameraSource = new CameraSource.Builder(this, barcodeDetector)
                .setRequestedPreviewSize(640, 480)
                .setAutoFocusEnabled(true)
                .build();

        surfaceView.getHolder().addCallback(new SurfaceHolder.Callback() {
            @Override
            public void surfaceCreated(SurfaceHolder holder) {
                try {
                    if (ActivityCompat.checkSelfPermission(MainActivity.this, Manifest.permission.CAMERA) == PackageManager.PERMISSION_GRANTED) {
                        cameraSource.start(surfaceView.getHolder());
                    } else {
                        ActivityCompat.requestPermissions(MainActivity.this,
                                new String[]{Manifest.permission.CAMERA},
                                REQUEST_CAMERA_PERMISSION);
                    }
                } catch (IOException e) {
                    e.printStackTrace();
                }
            }

            @Override
            public void surfaceChanged(@NonNull SurfaceHolder holder, int format, int width, int height) {}

            @Override
            public void surfaceDestroyed(@NonNull SurfaceHolder holder) {
                cameraSource.stop();
            }
        });

        barcodeDetector.setProcessor(new Detector.Processor<Barcode>() {
            @Override
            public void release() {}

            @Override
            public void receiveDetections(@NonNull Detector.Detections<Barcode> detections) {
                final SparseArray<Barcode> barcodes = detections.getDetectedItems();

                if (barcodes.size() != 0) {
                    barcodeText.post(() -> {
                        if (barcodes.valueAt(0).email != null) {
                            barcodeData = barcodes.valueAt(0).email.address;
                        } else {
                            barcodeData = barcodes.valueAt(0).displayValue;
                        }

                        barcodeText.setText(barcodeData);
                        toneGen1.startTone(ToneGenerator.TONE_CDMA_PIP, 150);
                    });
                }
            }
        });
    }

    @Override
    protected void onPause() {
        super.onPause();
        Objects.requireNonNull(getSupportActionBar()).hide();
        cameraSource.release();
    }

    @Override
    protected void onResume() {
        super.onResume();
        Objects.requireNonNull(getSupportActionBar()).hide();
        initialiseDetectorsAndSources();
    }
}
🔍 Code Explanation
SurfaceView & CameraSource
– SurfaceView: Renders the live camera preview.
– CameraSource: Controls the camera feed and feeds frames into the BarcodeDetector.
BarcodeDetector
– Set to detect all barcode formats using Barcode.ALL_FORMATS.
Permissions
– Checks for camera permission before starting the camera. Requests it if not already granted.
ToneGenerator
– A beep sound plays every time a barcode is successfully detected.
Barcode Processing
– If the barcode contains an email, it’s extracted separately; otherwise, the display value is shown.
– Data is updated on the UI thread using post() for safe rendering.
Preview Size
– Set using .setRequestedPreviewSize(640, 480) for balance between quality and performance.
This guide helped you build a real-time barcode scanner app using Java in Android Studio. You learned how to use SurfaceView, CameraSource, BarcodeDetector, and handle permissions, audio tones, and camera lifecycle.