Looking to build a fun and engaging spin-the-wheel app for giveaways, lucky draws, games, or random selections? This post covers a complete mini wheel spinner app built with:
✅ Android Java using Custom Views
✅ Android Jetpack Compose
✅ Cross-platform Flutter (Android, iOS, and Web)
It’s lightweight, beautifully animated, and perfect for learners and developers. Whether you’re creating a decision-maker app or adding gamification to your product — this is your go-to solution.
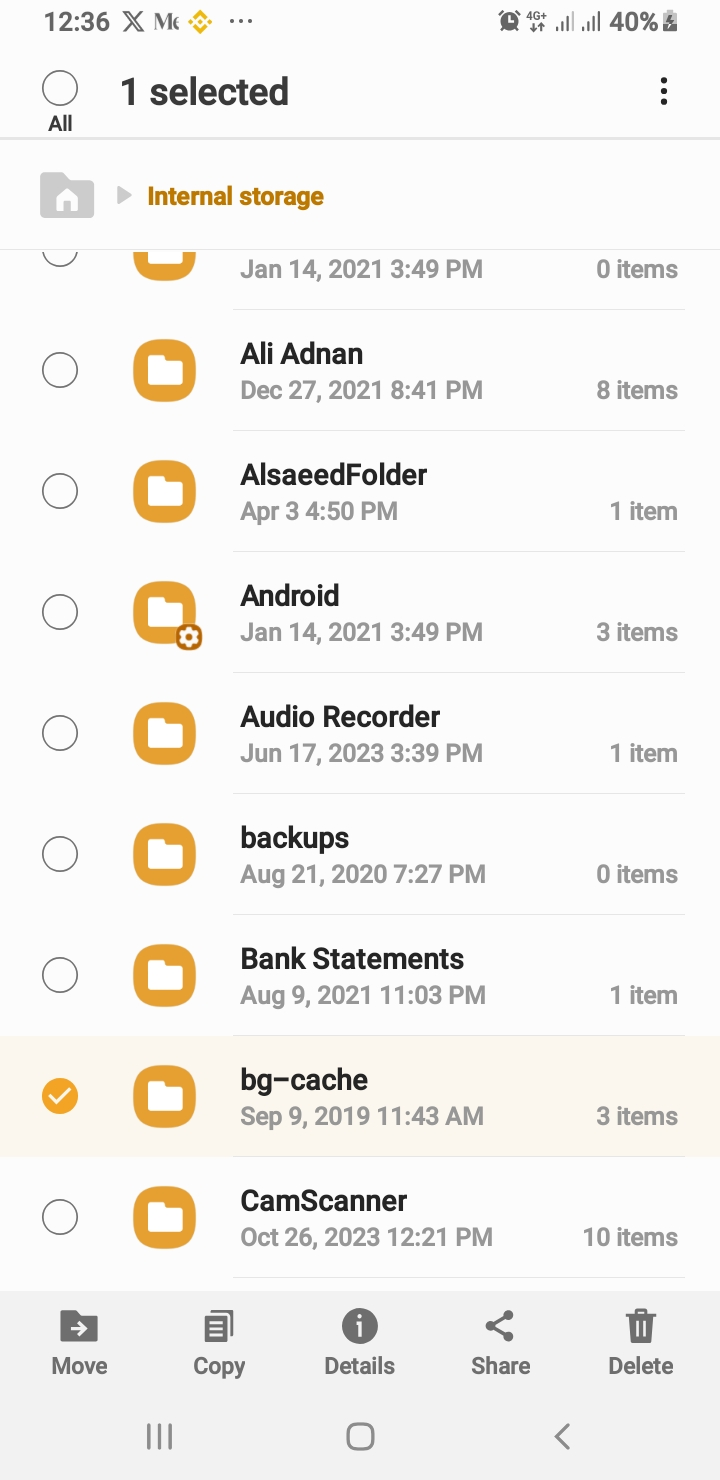
Looking for a production-ready Android file manager app source code written in Java? Look no further! File Manager Pro is a clean, fully functional, open-source file explorer built using modern development practices. It’s perfect for developers who want to learn, customize, or extend a real-world Android file manager project.
🚀 Key Features
✅ Browse files and folders with a responsive UI
✅ Toggle show/hide hidden files support
✅ Multi-select with bottom menu actions: Copy, Move, Delete
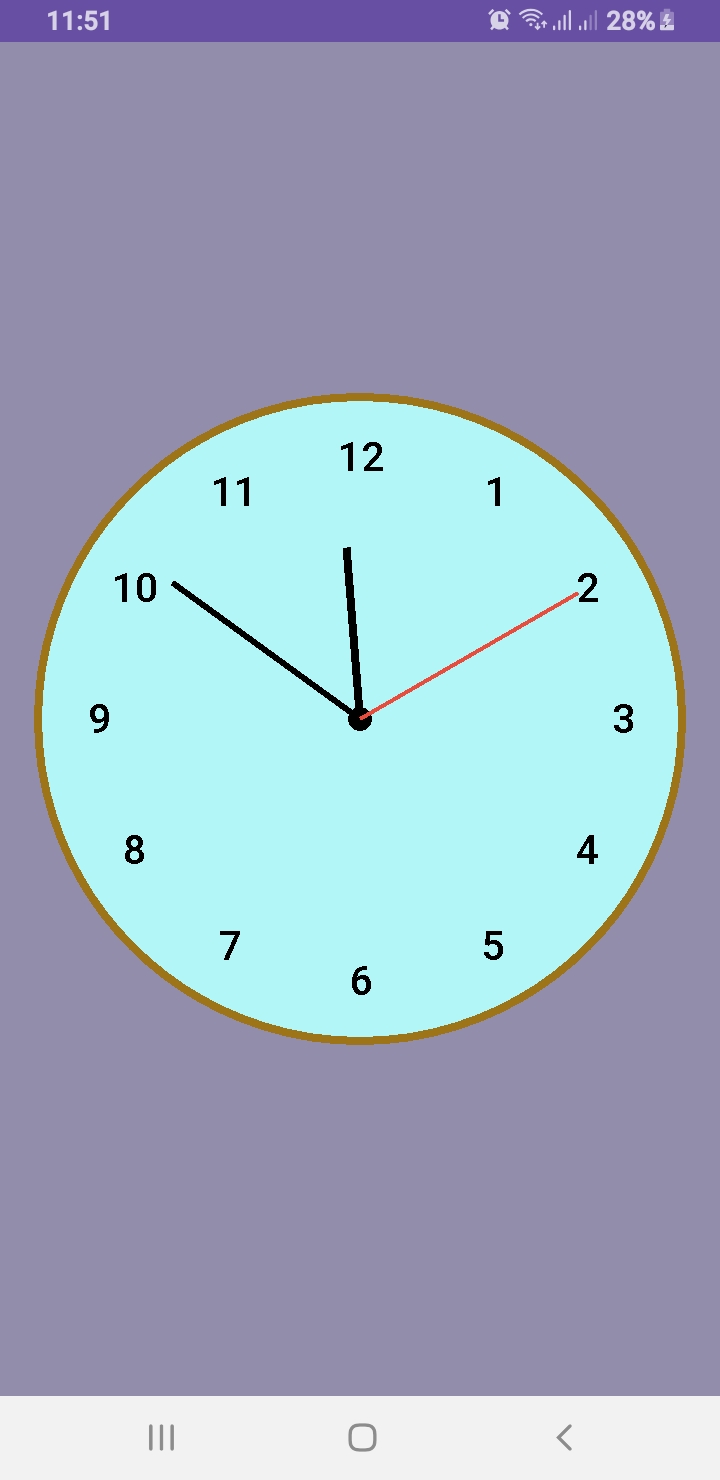
Want to design a custom analog clock in Android? In this post, you’ll learn how to create one using both Java and Kotlin. Whether you’re building a utility app, dashboard UI, or simply improving your UI skills, this is the perfect project to implement a working analog clock in Android.
🎯 What’s Inside This Project?
You’ll get the complete source code for both languages, canvas-based drawing, second-by-second ticking hands, and a beautiful rounded design. Let’s dive into development!
✅ What You’ll Learn
How to draw a custom analog clock using Canvas
Java and Kotlin implementations side by side
Center dot, circular frame, and dynamic ticking hands
Modern, responsive UI layout for all screen sizes
This article provides two versions: AnalogClockView.java and AnalogClockViewKotlin.kt. You can use either based on your language preference.
📄 XML Layout
To use the custom clock in your activity, add this to your activity_main.xml:
Creating a custom analog clock in Android is a great way to explore Canvas drawing, custom views, and elegant UI development. Whether you choose Java or Kotlin, the outcome is a clean and dynamic clock component ready for your next project.
We used the Paint class extensively to draw shapes and text on the canvas. To learn more about its capabilities, see the official documentation here:
🔗 Android Developers
Don’t forget to share and follow Al Saeed for more hands-on Android tutorials.
Are you tired of spending hours editing videos or struggling with complicated software? Whether you’re a content creator, marketer, or business owner, video is one of the most powerful tools for engaging your audience. But not everyone has the time or skills to create professional-quality videos — that’s where InVideo AI comes in.
That’s where InVideo AI comes in.
🚀 What Is InVideo AI?
InVideo AI is an advanced, AI-powered video creation tool that helps you turn your ideas into stunning videos—without needing any prior editing experience. With just a few prompts or a simple script, InVideo automatically generates a complete video, complete with visuals, music, transitions, and voiceovers.
Whether you’re making YouTube videos, Instagram reels, business promos, or ad creatives, InVideo AI handles the hard work for you.
✨ Key Features of InVideo AI
🤖 1. AI Script to Video
Just type your idea or paste a script—InVideo will turn it into a ready-to-publish video using AI-selected visuals and music.
🎤 2. AI Voiceovers
No need to record your own voice. Choose from dozens of realistic AI voice options in multiple languages.
📚 3. Templates for Every Industry
Choose from 5000+ professionally designed templates across niches like real estate, eCommerce, education, fitness, and more.
📱 4. Multi-Platform Export
Export in sizes perfect for YouTube, Instagram, Facebook, or TikTok in just a few clicks.
✏️ 5. Easy Customization
You can customize fonts, colors, branding, transitions, music, and more—even after the AI generates your video.
🎯 Who Should Use InVideo AI?
InVideo is perfect for:
YouTubers & Vloggers who want to create faster
Digital Marketers creating video ads or social posts
Small Business Owners promoting products
Freelancers & Agencies offering video content services
Teachers & Educators making engaging learning content
💡 Why Choose InVideo AI?
Unlike traditional video editors, InVideo focuses on speed, automation, and ease-of-use. You don’t need to spend hours editing or pay for expensive software like Adobe Premiere or Final Cut Pro.
InVideo gives you:
A massive library of stock videos & photos
Automatic subtitles & transitions
Free and premium plans to suit any budget
🔗 Try InVideo AI Now – Free!
You can get started with InVideo for free, and upgrade anytime if you need premium features.
If you’re looking for an AI video editor that saves time, improves quality, and boosts engagement—InVideo is your best bet. Whether you’re a beginner or a pro, it’s a game-changer in how videos are made today.
📝 Want more AI-powered tools and content creation tips? Check out our latest blog posts here and discover more ways to boost your productivity and creativity!
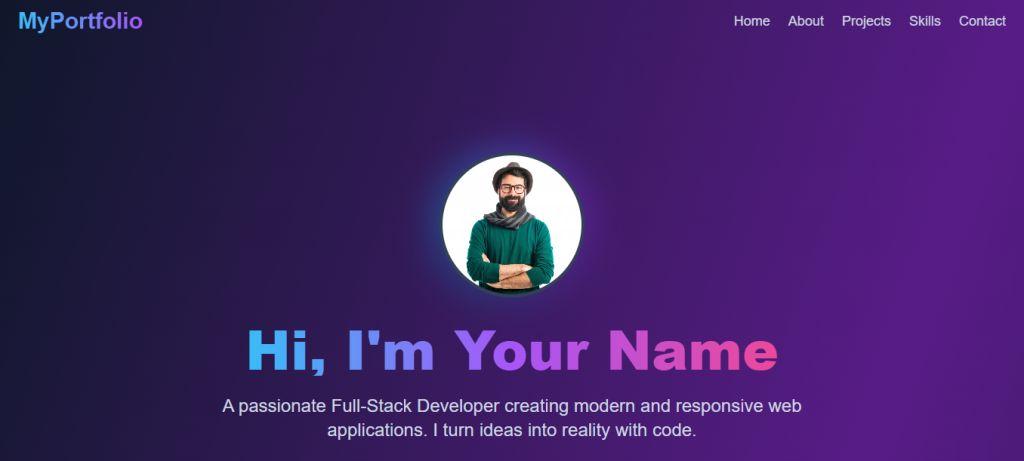
Are you a developer, designer, freelancer, or student looking to create a standout personal portfolio website without starting from scratch? This Free React Portfolio Website Template, generated using the latest AI technologies, helps you launch your professional online presence effortlessly.
Whether you’re showcasing your skills, side projects, or freelance services, this template gives you a modern, responsive, and SEO-friendly starting point — built with React + Vite for lightning-fast performance.
🎯 Why Use This Free React Portfolio Website Template?
Here are the top reasons why this React portfolio template stands out:
✅ Modern & Clean UI Design – Built with a sleek layout to attract and engage visitors ✅ Powered by React & Vite – Ensures optimal build speed and performance ✅ Responsive Design – Looks stunning on mobile, tablet, and desktop ✅ Highly Customizable – Edit styles, sections, and content with ease ✅ SEO Optimized – Fast load times, semantic HTML, and clean codebase ✅ Open-Source & Free – Use it freely for your personal or professional portfolio
This Free React Portfolio Website Template is your shortcut to building a beautiful and professional portfolio in no time.
🔧 Technologies Used
React.js – Component-based frontend library
Vite – Next-generation frontend tooling
CSS Modules / Tailwind CSS (optional depending on customization)
Free Source Code
Click the button below to download the complete source code:
If you’re looking to create a simple media player in Android Studio using Kotlin, this article will guide you through the core of your project: the MainActivity. This is where permissions are handled, songs are loaded from device storage, and user interactions are managed.
Overview of Media Player MainActivity
The MainActivity is responsible for:
Checking and requesting runtime permissions
Fetching music files from the device storage
Binding to the MusicService for background playback
Handling user interactions like play, pause, next, and previous
Kotlin Code Breakdown for Media Player
The class implements AppCompatActivity and ServiceConnection to establish communication with the background music service. It uses ActivityMainBinding for UI binding and coroutines to prevent blocking the main thread while querying songs from MediaStore.
Permission Handling for Media Player
For Android 13+ (Tiramisu), it requests READ_MEDIA_AUDIO. For earlier versions, READ_EXTERNAL_STORAGE is used.
Loading Songs
The app queries MediaStore.Audio.Media using a coroutine and populates the songsList if the files exist.
Binding Media Player to MusicService
On successful service connection, the list is passed to the service and the UI is updated with the currently playing song title.
Media Player Controls and Playback
The play/pause, next, and previous buttons update the state using MusicService. The UI is automatically refreshed using updateControls().
Other Media Player App Classes
To complete the media player, create the following Kotlin classes and paste their code accordingly:
MusicService.kt – Manages playback in the background
AudioModel.kt – Data class representing a song
MusicAdapter.kt – Binds song data to RecyclerView
MusicPlayerActivity.kt – Full screen music controls
1. MainActivity.kt
  class MainActivity : AppCompatActivity(), ServiceConnection {
    private var musicService: MusicService? = null
    private var isServiceBound = false
    private lateinit var binding: ActivityMainBinding
    private val songsList: MutableList = mutableListOf()
    private lateinit var adapter: MusicAdapter
    private var isPlaying = false

    override fun onCreate(savedInstanceState: Bundle?) {
        super.onCreate(savedInstanceState)
        binding = ActivityMainBinding.inflate(layoutInflater)
        setContentView(binding.root)
        window.statusBarColor = Color.WHITE

        if (!checkPermission()) {
            requestPermission()

        } else {
            initializeApp()
        }

    }


    private fun initializeApp() {
        // Launch coroutine on Main thread
        CoroutineScope(Dispatchers.Main).launch {

            // Show progress bar
            binding.progressBar.visibility = View.VISIBLE

            val songs = withContext(Dispatchers.IO) {
                val songs = ArrayList()
                val projection = arrayOf(
                    MediaStore.Audio.Media.TITLE,
                    MediaStore.Audio.Media.DATA,
                    MediaStore.Audio.Media.DURATION
                )
                val selection = MediaStore.Audio.Media.IS_MUSIC + " !=0"

                contentResolver.query(
                    MediaStore.Audio.Media.EXTERNAL_CONTENT_URI,
                    projection,
                    selection,
                    null,
                    null
                )?.use { cursor ->
                    while (cursor.moveToNext()) {
                        val audioModel = AudioModel(
                            cursor.getString(1),
                            cursor.getString(0),
                            cursor.getString(2)
                        )
                        if (File(audioModel.path).exists()) {
                            songs.add(audioModel)
                        }
                    }
                }
                songs
            }

            // Hide progress bar
            binding.progressBar.visibility = View.GONE

            songsList.clear()
            songsList.addAll(songs)

            adapter = MusicAdapter(this@MainActivity, songsList) { position ->
                if (isPlaying) {
                    musicService?.musicPlay(songsList)
                    binding.songTitle.text = songsList[MyMediaPlayer.currentIndex].title
                    adapter.notifyDataSetChanged()
                } else {

                    if (songsList.isNotEmpty()) {
                        val intent = Intent(this@MainActivity, MusicPlayerActivity::class.java)
                        intent.putExtra("List", songsList as Serializable)
                        intent.flags = Intent.FLAG_ACTIVITY_NEW_TASK
                        startActivity(intent)
                    } else {
                        Toast.makeText(this@MainActivity, "No songs to play", Toast.LENGTH_SHORT)
                            .show()
                    }

                }
            }

            binding.recyclerView.layoutManager = LinearLayoutManager(this@MainActivity)
            binding.recyclerView.adapter = adapter
            binding.noSongFound.visibility = if (songsList.isEmpty()) View.VISIBLE else View.GONE

            setupControls()
        }
    }


    private fun setupControls() {
        val intent = Intent(this, MusicService::class.java)
        bindService(intent, this, Context.BIND_AUTO_CREATE)

        binding.pausePlay.setOnClickListener {
            musicService?.getMusicPlayer()?.let {
                if (it.isPlaying) {
                    it.pause()
                    binding.pausePlay.setImageResource(R.drawable.play_ic)
                } else {
                    it.start()
                    binding.pausePlay.setImageResource(R.drawable.pause_ic)
                }
            }
        }


        binding.next.setOnClickListener { musicNext() }
        binding.previous.setOnClickListener { musicPrevious() }

        binding.controls.setOnClickListener {
            val intent1 = Intent(this@MainActivity, MusicPlayerActivity::class.java)
            intent1.putExtra("IS", true)
            intent1.putExtra("List", songsList as Serializable)
            startActivity(intent1)
        }
    }


    private fun musicNext() {

        musicService?.next()
        binding.songTitle.text = songsList[MyMediaPlayer.currentIndex].title
        adapter.notifyDataSetChanged()

    }


    private fun musicPrevious() {
        musicService?.previous()
        binding.songTitle.text = songsList[MyMediaPlayer.currentIndex].title
        adapter.notifyDataSetChanged()

    }


    private fun checkPermission(): Boolean {

        val result = ContextCompat.checkSelfPermission(
            this@MainActivity,
            Manifest.permission.READ_EXTERNAL_STORAGE
        )

        if (result == PackageManager.PERMISSION_GRANTED) {
            return true

        } else {
            return false
        }
    }


    private fun requestPermission() {
        val permission = Manifest.permission.READ_EXTERNAL_STORAGE

        if (Build.VERSION.SDK_INT >= Build.VERSION_CODES.TIRAMISU) {
            // For Android 13+ (Tiramisu), use READ_MEDIA_AUDIO instead
            ActivityCompat.requestPermissions(
                this,
                arrayOf(Manifest.permission.READ_MEDIA_AUDIO),
                92
            )
        } else {

            ActivityCompat.requestPermissions(
                this,
                arrayOf(permission),
                92
            )

        }
    }


    override fun onRequestPermissionsResult(
        requestCode: Int,
        permissions: Array,
        grantResults: IntArray
    ) {
        super.onRequestPermissionsResult(requestCode, permissions, grantResults)

        if (requestCode == 92 && grantResults.isNotEmpty() && grantResults[0] == PackageManager.PERMISSION_GRANTED) {
            Toast.makeText(this, "Permission granted", Toast.LENGTH_SHORT).show()
            initializeApp() // Or load your music files
        } else {
            Toast.makeText(this, "Permission denied", Toast.LENGTH_SHORT).show()
            requestPermission()
        }
    }


    override fun onServiceConnected(name: ComponentName?, service: IBinder?) {
        val binder = service as MusicService.MyBinder
        musicService = binder.currentService()
        isServiceBound = true
        musicService!!.setSongLIst(songsList)

        // Update the controls based on the current state of the media player
        updateControls()
    }

    override fun onServiceDisconnected(name: ComponentName?) {
        musicService = null
        isServiceBound = false
    }


    private fun updateControls() {
        musicService?.getMusicPlayer()?.let { mediaPlayer ->
            if (mediaPlayer.isPlaying) {
                binding.controls.visibility = View.VISIBLE
                binding.songTitle.text = songsList[MyMediaPlayer.currentIndex].title
                binding.pausePlay.setImageResource(R.drawable.pause_ic)
                isPlaying = true
            } else {
                isPlaying = false
                binding.controls.visibility = View.GONE
            }

            mediaPlayer.setOnCompletionListener {
                musicNext() // Move to the next song when the current song is completed.
            }
        }

    }

    @SuppressLint("NotifyDataSetChanged")
    override fun onResume() {
        super.onResume()
        if (::adapter.isInitialized) {
            adapter.notifyDataSetChanged()
            updateControls()
        }

    }

    override fun onDestroy() {
        super.onDestroy()
        if (isServiceBound) {
            unbindService(this)
            isServiceBound = false
        }
    }
}
2. MusicService.kt
class MusicService : Service() {

    private var myBinder = MyBinder()
    private var mediaPlayer: MediaPlayer? = MyMediaPlayer.getInstance()
    private var currentSongPath: String? = null
    private var isAlreadyPlaying = false
    private var songsList: List? = null


    fun setSongLIst(list: List) {
        songsList = list

    }

    public fun getMusicPlayer(): MediaPlayer? {
        return mediaPlayer
    }


    override fun onBind(intent: Intent?): IBinder? {
        return myBinder

    }


    fun musicPlay(songList: List) {
        currentSongPath = songList[MyMediaPlayer.currentIndex].path
        mediaPlayer!!.reset()
        mediaPlayer!!.setDataSource(currentSongPath)
        mediaPlayer!!.prepare()
        mediaPlayer!!.start()

    }


    fun pause() {
        mediaPlayer?.pause()
        Log.d("MyService", "Pausing music")
    }

    fun stop() {
        mediaPlayer?.stop()
        Log.d("MyService", "Stopping music")
    }


    fun next() {
        if (MyMediaPlayer.currentIndex == songsList!!.size - 1) {
            return
        }

        MyMediaPlayer.currentIndex += 1
        mediaPlayer!!.reset()
        if (songsList != null) {
            musicPlay(songsList!!)
        }
        isAlreadyPlaying = false


    }


    fun previous() {
        if (MyMediaPlayer.currentIndex == 0) {
            return
        }
        MyMediaPlayer.currentIndex -= 1
        mediaPlayer!!.reset()
        if (songsList != null) {
            musicPlay(songsList!!)
        }
        isAlreadyPlaying = false

    }


    fun getPlayingStatus(): Boolean {
        return isAlreadyPlaying
    }


    fun isPlaying(): Boolean {
        return mediaPlayer?.isPlaying ?: false
    }

    fun getCurrentPosition(): Int {
        return mediaPlayer?.currentPosition ?: 0
    }

    fun seekTo(position: Int) {
        mediaPlayer?.seekTo(position)
    }


    override fun onDestroy() {
        super.onDestroy()
    }


    inner class MyBinder : Binder() {
        fun currentService(): MusicService {
            return this@MusicService
        }
    }

}
3. MusicAdapter.kt
class MusicAdapter(
    private val context: Context,
    private val songList: List,
    private val onClick: (Int) -> Unit
) : RecyclerView.Adapter() {


    override fun onCreateViewHolder(parent: ViewGroup, viewType: Int): ItemHolder {
        val view = SongItemBinding.inflate(LayoutInflater.from(context), parent, false)
        return ItemHolder(view)
    }

    override fun getItemCount(): Int {
        return songList.size
    }


    public fun getSongLIst(): List {
        return songList
    }

    override fun onBindViewHolder(holder: ItemHolder, position: Int) {
        val audioSong = songList[position]
        holder.bind(audioSong, position)
    }


    inner class ItemHolder(private val binding: SongItemBinding) :
        RecyclerView.ViewHolder(binding.root) {


        fun bind(audioSong: AudioModel, position: Int) {

            if (MyMediaPlayer.currentIndex == position) {
                binding.tvSongTitle.setTextColor(Color.RED)
            } else {
                binding.tvSongTitle.setTextColor(Color.BLACK)
            }
            binding.tvSongTitle.text = audioSong.title
            //   binding.ivMusic.setImageResource(R.drawable.music_ic)

            binding.root.setOnClickListener {
                MyMediaPlayer.getInstance().reset()
                MyMediaPlayer.currentIndex = adapterPosition
                onClick(adapterPosition)


            }

        }

    }
}
This Android media player in Kotlin is lightweight, efficient, and follows best practices for modern development using ViewBinding, coroutines, and service components. Add more features like notifications, shuffle, or repeat to further enhance your app.
You can also Check Out the official Android Media Player Documentation.
Want to learn more? Visit our tutorials at Blog .
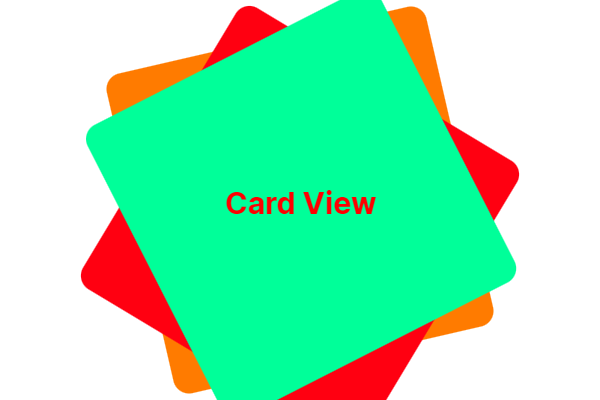
Creating an interactive card-based interface in Jetpack Compose is easier than ever. Today, we will explore how to implement a smooth Card Animation in Jetpack using swipe or tap gestures on cards with the CardSwipeOrTap composable. This approach is perfect for modern UI designs where users interact with content via gestures.
Main Activity Setup
We start by setting up the MainActivity that uses a Scaffold layout inside the RecyclerViewTheme. This ensures that our UI fills the entire screen while providing padding to our card interactions.
The CardSwipeOrTap composable manages the card stack. It uses a Box to overlay cards on top of each other and applies a slight rotation and vertical offset for a realistic stacked effect.
Each card is individually rendered using the CardItem composable. We use a simple CoroutineScope to delay actions and allow for smooth animations between swipe or tap events.
@Composable
fun CardSwipeOrTap(modifier: Modifier = Modifier) {
    val scope = rememberCoroutineScope()
    var cards by remember { mutableStateOf(listOf(0, 1, 2)) }
    var isAnimating by remember { mutableStateOf(false) }

    val cardColors = listOf(
        Color(0xFFFF9800), // Orange
        Color(0xFFF44336), // Red
        Color(0xFF00E676)  // Light Green
    )

    Box(
        modifier = modifier.fillMaxSize().padding(32.dp),
        contentAlignment = Alignment.Center
    ) {
        cards.reversed().forEachIndexed { index, cardIndex ->
            CardItem(
                index = cardIndex,
                color = cardColors[cardIndex % cardColors.size],
                rotation = if (index == 0) 0f else if (index == 1) -10f else 10f,
                offsetY = (index * 20).dp,
                isTop = index == cards.size - 1,
                isAnimating = isAnimating,
                onSwiped = {
                    if (!isAnimating) {
                        isAnimating = true
                        scope.launch {
                            kotlinx.coroutines.delay(300)
                            val updated = cards.toMutableList()
                            val removed = updated.removeAt(0)
                            updated.add(removed)
                            cards = updated
                            isAnimating = false
                        }
                    }
                }
            )
        }
    }
}
Animating Card Movement with CardItem
The CardItem composable handles the animation when a user swipes or taps a card. It uses animateDpAsState and animateFloatAsState to animate the card’s offset and opacity, giving the appearance of a disappearing card when an interaction occurs.
With just a few lines of Kotlin code, you can create a stunning card swipe and tap animation in Jetpack Compose. This approach is not only visually appealing but also highly interactive, offering a smooth user experience without the complexity of a traditional RecyclerView setup. Try it out in your next Android app project!
Discover how to easily Extract the text From image using python to pdf and word file. This guide shows you how to build a Python Tkinter application that extracts text from images and saves it into Word or PDF files effortlessly.
Introduction
Manually extracting text from images can be a tedious task. Thankfully, Python offers powerful libraries like pytesseract and Tkinter to automate this process. In this tutorial, you’ll learn how to Extract the text From an image to pdf and word file by creating an easy-to-use desktop application. This project is perfect for beginners exploring GUI development and OCR (Optical Character Recognition).
Technologies Used
Python – Programming language
Tkinter – GUI toolkit for Python
pytesseract – Optical Character Recognition (OCR) tool
Pillow – Image processing library
fpdf – PDF creation library
python-docx – Word document generation library
Installation Guide for Technologies Used
Before building the project to Extract the Text from an Image Using Python, make sure to install the following required libraries and tools.
1. Install Python
Make sure you have Python installed. You can download it from the official site: Download Python.
2. Install Required Python Libraries
# Install tkinter (already included with Python on most systems)
# For Linux, you can install manually:
sudo apt-get install python3-tk

# Install pytesseract
pip install pytesseract

# Install Pillow for image processing
pip install Pillow

# Install fpdf to create PDF files
pip install fpdf

# Install python-docx to create Word documents
pip install python-docx
3. Install Tesseract-OCR Engine
Since pytesseract is only a wrapper, you also need to install the Tesseract-OCR engine:
Adjust the path if you installed Tesseract in a different location.
5. (Optional) Create a requirements.txt
To install all packages at once, you can create a requirements.txt file with the following content:
pytesseract
Pillow
fpdf
python-docx
Then run:
pip install -r requirements.txt
Now your Python environment is fully ready to build the project and extract text from images easily!
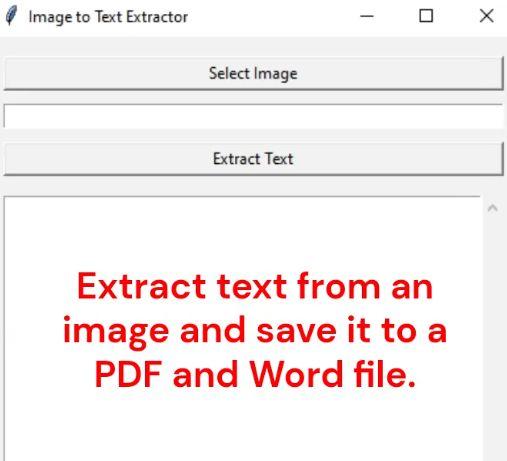
Project Overview: Extract the text From an image to pdf and word file
This simple Python application allows users to:
Select an image (formats: PNG, JPG, BMP, TIFF)
Extract text using OCR
View extracted text in a scrollable text box
Save extracted text as a Word (.docx) file
Save extracted text as a PDF (.pdf) file
How It Works
1. Selecting an Image
Click the “Select Image” button to open a file dialog where you can choose an image file. The application supports PNG, JPG, BMP, and TIFF formats.
2. Extracting Text
After selecting an image, click “Extract Text”. The app uses Tesseract OCR to scan the image and retrieve all readable text, which is displayed inside a scrollable text widget.
3. Saving as Word or PDF
Once the text is extracted, you can choose to save it as a Word document or a PDF file. The application ensures Unicode font support for multi-language text.
pdf = FPDF()
pdf.add_page()
pdf.add_font('DejaVu', '', font_path, uni=True)
pdf.set_font('DejaVu', '', 12)
for line in text.split('\n'):
pdf.multi_cell(0, 10, line)
pdf.output(filepath)
Benefits of Automating Text Extraction
Saves time compared to manual typing
Improves data entry accuracy
Streamlines document management
Boosts productivity for businesses and individuals
Complete Code extract-text.py
import tkinter as tk
from tkinter import filedialog, messagebox, ttk
from tkinter.scrolledtext import ScrolledText
from PIL import Image
import pytesseract
from docx import Document
from fpdf import FPDF
import os
import threading
# Set path to tesseract.exe
pytesseract.pytesseract.tesseract_cmd = r"C:\Program Files\Tesseract-OCR\tesseract.exe" # Adjust if needed
def select_image():
filepath = filedialog.askopenfilename(
title="Select an image file",
filetypes=[("Image Files", "*.png *.jpg *.jpeg *.bmp *.tiff")]
)
if filepath:
entry_file.delete(0, tk.END)
entry_file.insert(0, filepath)
def extract_text_threaded():
threading.Thread(target=extract_text).start()
def extract_text():
image_path = entry_file.get()
if not os.path.exists(image_path):
messagebox.showerror("Error", "Image file does not exist!")
return
try:
progress_bar.place(relx=0.5, rely=0.5, anchor="center") # Centered inside text box
progress_bar.start()
img = Image.open(image_path)
text = pytesseract.image_to_string(img)
if not text.strip():
messagebox.showinfo("No Text", "No text detected in the image.")
return
text_box.config(state=tk.NORMAL)
text_box.delete(1.0, tk.END)
text_box.insert(tk.END, text)
text_box.config(state=tk.NORMAL)
except Exception as e:
messagebox.showerror("Error", str(e))
finally:
progress_bar.stop()
progress_bar.place_forget() # Hide progress bar
def save_as_word():
text = text_box.get(1.0, tk.END).strip()
if not text:
messagebox.showwarning("Warning", "No text to save!")
return
filepath = filedialog.asksaveasfilename(
defaultextension=".docx",
filetypes=[("Word Document", "*.docx")]
)
if filepath:
try:
doc = Document()
doc.add_paragraph(text)
doc.save(filepath)
messagebox.showinfo("Saved", f"Text saved as Word file:\n{filepath}")
except Exception as e:
messagebox.showerror("Error", str(e))
def save_as_pdf():
text = text_box.get(1.0, tk.END).strip()
if not text:
messagebox.showwarning("Warning", "No text to save!")
return
filepath = filedialog.asksaveasfilename(
defaultextension=".pdf",
filetypes=[("PDF file", "*.pdf")]
)
if filepath:
try:
pdf = FPDF()
pdf.add_page()
# Add a Unicode font (DejaVuSans.ttf must be in the same folder)
font_path = os.path.join(os.path.dirname(__file__), r"D:\Python\extract-text\DejavuSans.ttf")
pdf.add_font('DejaVu', '', font_path, uni=True)
pdf.set_font('DejaVu', '', 12)
for line in text.split('\n'):
pdf.multi_cell(0, 10, line)
pdf.output(filepath)
messagebox.showinfo("Saved", f"Text saved as PDF file:\n{filepath}")
except Exception as e:
messagebox.showerror("Error", str(e))
# Helper function to get correct path for icon
def resource_path(relative_path):
try:
# PyInstaller creates a temp folder and stores path in _MEIPASS
base_path = sys._MEIPASS
except Exception:
base_path = os.path.abspath(".")
return os.path.join(base_path, relative_path)
# --- GUI ---
root = tk.Tk()
root.title("Image to Text Extractor")
root.minsize(400, 600) # Minimum window size
frame = tk.Frame(root, padx=10, pady=10)
frame.pack(fill=tk.BOTH, expand=True)
# Widgets
btn_select = tk.Button(frame, text="Select Image", command=select_image)
entry_file = tk.Entry(frame, width=50)
btn_extract = tk.Button(frame, text="Extract Text", command=extract_text_threaded)
text_frame = tk.Frame(frame)
text_box = ScrolledText(text_frame, width=80, height=20, wrap=tk.WORD)
progress_bar = ttk.Progressbar(text_frame, orient=tk.HORIZONTAL, mode='indeterminate', length=200)
progress_bar.place_forget()
btn_save_word = tk.Button(frame, text="Save as Word", command=save_as_word)
btn_save_pdf = tk.Button(frame, text="Save as PDF", command=save_as_pdf)
# Layout function (dynamic)
def layout_widgets(event=None):
width = root.winfo_width()
# Clear old layout
for widget in frame.winfo_children():
widget.grid_forget()
widget.pack_forget()
if width < 500: # Mobile Layout
btn_select.pack(pady=5, fill=tk.X)
entry_file.pack(pady=5, fill=tk.X)
btn_extract.pack(pady=5, fill=tk.X)
text_frame.pack(pady=10, fill=tk.BOTH, expand=True)
text_box.pack(fill=tk.BOTH, expand=True)
btn_save_word.pack(pady=5, fill=tk.X)
btn_save_pdf.pack(pady=5, fill=tk.X)
else: # Desktop Layout
btn_select.grid(row=0, column=0, padx=5, pady=5)
entry_file.grid(row=0, column=1, padx=5, pady=5, sticky="ew")
btn_extract.grid(row=0, column=2, padx=5, pady=5)
frame.grid_columnconfigure(1, weight=1)
text_frame.grid(row=1, column=0, columnspan=3, pady=10, sticky="nsew")
text_box.pack(fill=tk.BOTH, expand=True)
btn_save_word.grid(row=2, column=0, pady=5)
btn_save_pdf.grid(row=2, column=2, pady=5)
# Make sure frame expands correctly
frame.pack(fill=tk.BOTH, expand=True)
# Bind resize event
root.bind("", layout_widgets)
# Initialize layout
layout_widgets()
root.mainloop()
By completing this project, you now know how to Extract the text From an image to pdf and word file using a Python Tkinter GUI application. This hands-on project introduces you to OCR technology and file conversion, which are valuable skills for automating tasks and improving workflow efficiency. You can extend this app by adding features like multi-image processing or cloud uploads to make it even more powerful!
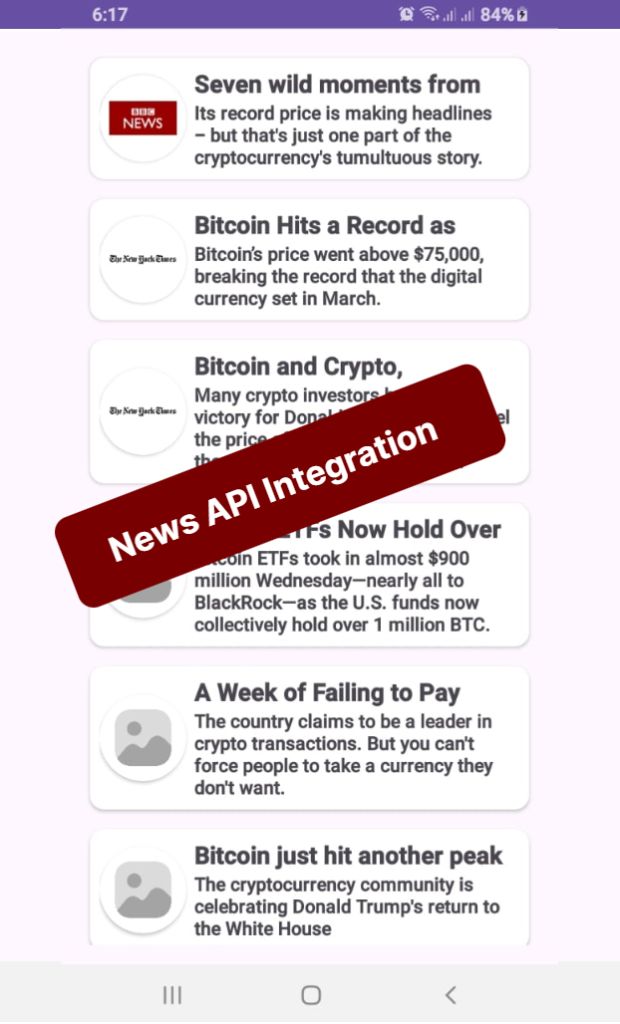
In today’s mobile-first world, delivering real-time content quickly and smoothly is crucial for user engagement. In this tutorial on News API Integration In Android App Java, you’ll learn how to fetch and display news articles in an Android app using Retrofit, RecyclerView, and ProgressBar, while implementing an infinite scroll feature — all written in Java.
By the end of this guide, you will have a working news app that fetches the latest articles based on a search query and loads more content as the user scrolls down.
🚀 Key Components We’ll Use
RecyclerView — To display news articles in a scrollable list.
ProgressBar — To show loading status while fetching data.
Retrofit — For efficient and safe API calls.
Infinite Scrolling — Load more news automatically when the user reaches the end.
Handler — To simulate slight loading delays during pagination.
🔧 Step-by-Step Implementation
1. Setting Up RecyclerView
First, we initialize our RecyclerView and set up a custom NewsAdapter to bind news articles dynamically.
By combining Retrofit, RecyclerView, and ProgressBar, we’ve built a highly efficient, real-time news app that supports infinite scrolling in Android using Java.
This pattern is extremely useful for creating news apps, social media feeds, blogs, and any app that requires real-time content loading.
Pro Tip: Always handle error cases smartly (like no internet, API limit errors) to enhance user experience even further.
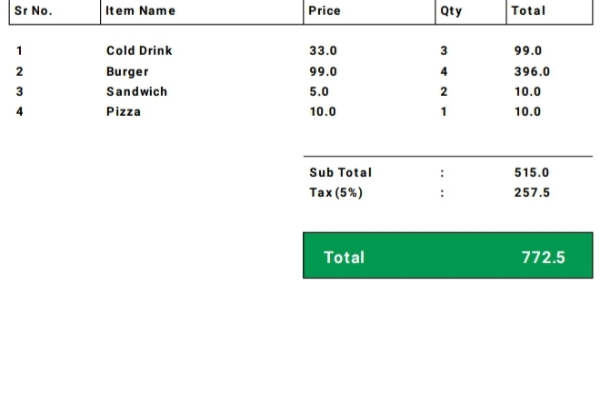
Introduction
In this tutorial, we will explore how to develop a Barcode Scanner Invoice Generator App in Android Java that allows users to scan barcodes, add products to a list, and generate a PDF invoice. This app is ideal for small businesses or retail stores that need a quick and efficient way to manage transactions. By the end of this guide, you’ll be able to build a fully functional barcode scanner invoice generator app using modern Android development tools.
Prerequisites
Before getting started, ensure you have the following:
Android Studio installed
Basic knowledge of Java/Kotlin
Dependencies for barcode scanning and PDF generation
Step 1: Adding Dependencies
To enable barcode scanning and PDF generation, add the following dependencies to your build.gradle file:
By following these steps, you can build a functional Android application that scans barcodes, lists products in a RecyclerView, and generates a PDF invoice. This project is highly useful for businesses looking for an easy invoicing system within their Android app.
If you’re looking to build an Android Image Compressor App with Image Picker that lets users select, compress, and save images directly to their device, you’re in the right place. In this tutorial, we’ll walk you through how to create an Android image compression tool using Java, ActivityResultLauncher, SeekBar, and a multithreaded approach for performance.
🔧 What This App Does
Select images using the modern Image Picker API
Display original and compressed images
Adjust compression quality via SeekBar
Save compressed images to external storage
Optimize image processing using ExecutorService
🚀 Step-by-Step Breakdown
1. Image Selection Using ActivityResultLauncher
The app uses ActivityResultContracts.PickVisualMedia() to allow users to select an image from their gallery. Once an image is picked, it’s displayed in the original image view using:
A SeekBar allows users to set the compression level in real-time. The compressionQuality variable updates with each user interaction, and the value is shown dynamically using a TextView.
To keep the UI responsive, the app uses ExecutorService to handle compression on a background thread. This ensures the main thread isn’t blocked while processing images.
Once an image is compressed, users can tap a button to save it into the Pictures/CompressedImages folder. The file is written using FileOutputStream, and then registered in the device gallery.
addImageToGallery(file);
5. Displaying the Result
The app shows both the original and compressed image side by side, allowing users to visually compare them. A progress bar is used to indicate when compression is happening in the background.
🧠 Key Concepts Used
Bitmap Compression with Bitmap.compress()
Multithreading with Executors.newFixedThreadPool()
Modern Media Picker with ActivityResultContracts
Storage Access with Environment.getExternalStoragePublicDirectory()
Gallery Update via MediaStore
🛡️ Final Touch: Cleanup
Always remember to shut down the ExecutorService when the activity is destroyed to prevent memory leaks:
public class MainActivity extends AppCompatActivity {
private Button btnImagesSelect, btnSaveImages, btnCompressImages;
private TextView tvSeekValue;
private SeekBar compressionSeekBar;
private int compressionQuality = 100; // Default to 100%
ImageModel imageModel;
private ImageView originalImageView, compressedImageView;
private ProgressBar progressBar;
private final ExecutorService executorService = Executors.newFixedThreadPool(2);
ActivityResultLauncher pickMultipleMedia =
registerForActivityResult(new ActivityResultContracts.PickVisualMedia(), uri -> {
if (uri != null) {
// Handle the selected media URI (image or video)
Log.d("Selected URI", uri.toString());
setImageInImageView(uri);
} else {
Log.d("PickMedia", "No media selected");
}
});
@Override
protected void onCreate(Bundle savedInstanceState) {
super.onCreate(savedInstanceState);
setContentView(R.layout.activity_main);
originalImageView = findViewById(R.id.originalImageView);
compressedImageView = findViewById(R.id.compressedImageView);
btnImagesSelect = findViewById(R.id.selectImagesButton);
btnSaveImages = findViewById(R.id.saveImagesButton);
btnCompressImages = findViewById(R.id.compressImages);
compressionSeekBar = findViewById(R.id.compressionSeekBar);
tvSeekValue = findViewById(R.id.tvSeekValue);
progressBar = findViewById(R.id.progressBar);
btnImagesSelect.setOnClickListener(view -> openImagePicker());
btnSaveImages.setOnClickListener(view -> saveCompressedImages());
btnCompressImages.setOnClickListener(v -> compressImagesInBackground());
compressionSeekBar.setOnSeekBarChangeListener(new SeekBar.OnSeekBarChangeListener() {
@Override
public void onProgressChanged(SeekBar seekBar, int progress, boolean fromUser) {
compressionQuality = progress;
tvSeekValue.setText("Compression: " + progress + "%");
}
@Override
public void onStartTrackingTouch(SeekBar seekBar) {
}
@Override
public void onStopTrackingTouch(SeekBar seekBar) {
}
});
}
// open image picker to pick the image
private void openImagePicker() {
 pickMultipleMedia.launch(new PickVisualMediaRequest.Builder()
    .setMediaType(ActivityResultContracts.PickVisualMedia.ImageOnly.INSTANCE)
    .build());
}
// set the selected image in the original image view
private void setImageInImageView(Uri uri) {
executorService.execute(() -> {
try {
InputStream inputStream = getContentResolver().openInputStream(uri);
Bitmap originalBitmap = BitmapFactory.decodeStream(inputStream);
imageModel = new ImageModel(originalBitmap, uri);
runOnUiThread(() -> {
originalImageView.setImageBitmap(originalBitmap);
compressedImageView.setImageBitmap(null);
});
} catch (IOException e) {
e.printStackTrace();
}
});
}
// compressed image in the background
private void compressImagesInBackground() {
progressBar.setVisibility(View.VISIBLE);
executorService.execute(() -> {
Bitmap compressedBitmap = compressImage(imageModel.getOriginalImage(), compressionQuality);
imageModel.setCompressedImage(compressedBitmap);
runOnUiThread(() -> {
compressedImageView.setImageBitmap(compressedBitmap);
progressBar.setVisibility(View.GONE);
});
});
}
//compress image method, which is calling in the compressImagesInBackground method
private Bitmap compressImage(Bitmap original, int quality) {
ByteArrayOutputStream stream = new ByteArrayOutputStream();
original.compress(Bitmap.CompressFormat.JPEG, quality, stream);
byte[] byteArray = stream.toByteArray();
return BitmapFactory.decodeByteArray(byteArray, 0, byteArray.length);
}
// save the compressed image in the phone storage
private void saveCompressedImages() {
executorService.execute(() -> {
File directory = new File(Environment.getExternalStoragePublicDirectory(Environment.DIRECTORY_PICTURES), "CompressedImages");
if (!directory.exists()) {
directory.mkdirs();
}
File file = new File(directory, "compressed_" + System.currentTimeMillis() + ".jpg");
try (FileOutputStream fos = new FileOutputStream(file)) {
imageModel.getCompressedImage().compress(Bitmap.CompressFormat.JPEG, 100, fos);
fos.flush();
addImageToGallery(file);
} catch (IOException e) {
e.printStackTrace();
}
// Show toast with full image path
runOnUiThread(() -> Toast.makeText(
this,
"Image saved at:\n" + file.getAbsolutePath(),
Toast.LENGTH_LONG
).show());
});
}
//show the image in the gallery
private void addImageToGallery(File file) {
ContentValues values = new ContentValues();
values.put(MediaStore.Images.Media.DATA, file.getAbsolutePath());
values.put(MediaStore.Images.Media.MIME_TYPE, "image/jpeg");
getContentResolver().insert(MediaStore.Images.Media.EXTERNAL_CONTENT_URI, values);
}
 @Override
protected void onDestroy() {
    super.onDestroy();
    executorService.shutdown();
}
}
📦 2. ImageModel.java – Custom Model Class for Handling Images
💡 Note: This is a reusable model class used to store and manage both the original and compressed image Bitmaps, along with the image URI. While it’s helpful for clean code and scalability, you can also work without a model class if you prefer a simpler implementation.
public class ImageModel {
    private Bitmap originalImage;
    private Bitmap compressedImage;
    private Uri imageUri;

    public ImageModel(Bitmap originalImage, Uri imageUri) {
        this.originalImage = originalImage;
        this.imageUri = imageUri;
        this.compressedImage = originalImage;
    }

    public Bitmap getOriginalImage() {
        return originalImage;
    }

    public Bitmap getCompressedImage() {
        return compressedImage;
    }

    public void setCompressedImage(Bitmap compressedImage) {
        this.compressedImage = compressedImage;
    }

    public Uri getImageUri() {
        return imageUri;
    }
}
This Android image compressor app provides a practical implementation of media handling, compression, and storage. Whether you’re building a photo editing app or simply want to reduce image size before upload, this codebase gives you a solid foundation to build on.
Looking to create a Simple Web Browser in Android Using WebView in Java that mimics Google Chrome? In this tutorial, we’ll walk you through building a full-featured, modern web browser in Java using Android Studio. This browser includes essential features like web page loading, navigation buttons, progress bar, and URL input with “GO” button support — all wrapped in a sleek UI similar to Chrome.
🔧 Features of This Android Web Browser
URL input bar with IME GO button handling
Full WebView support with JavaScript enabled
Progress bar to indicate page loading status
Back and Forward navigation buttons
Proper back press handling using OnBackPressedDispatcher
📱 MainActivity.java – Complete Code Overview
The heart of our browser lies in the MainActivity.java. Here’s what each component does: